Battle of St Quentin Canal

Last updated

Battle of St Quentin Canal
Part of the Hundred Days Offensive of World War I
Breaking the hindenburg line.jpg
Breaking the Hindenburg Line by William Longstaff
Date29 September – 10 October 1918
Location 49°57′42″N03°14′12″E / 49.96167°N 3.23667°E / 49.96167; 3.23667 Coordinates: 49°57′42″N03°14′12″E / 49.96167°N 3.23667°E / 49.96167; 3.23667
Result Allied victory
Belligerents

Flag of the United Kingdom.svg  United Kingdom

Flag of the United States (1912-1959).svg  United States
Flag of the German Empire.svg Germany
Commanders and leaders
Flag of the United Kingdom.svg Sir Henry Rawlinson
Flag of Australia (converted).svg Sir John Monash
Flag of the United Kingdom.svg Sir Walter Braithwaite
Flag of the United States (1912-1959).svg George Windle Read
Flag of the German Empire.svg Adolph von Carlowitz
Strength
32 divisions: 30 British Empire; two United States divisions [1] 39 divisions [lower-alpha 1]
Casualties and losses
Flag of the United Kingdom.svg 8,802 (partial) [3] [4]
Flag of the United States (1912-1959).svg 13,182 [5]
Flag of Australia (converted).svg 2,577 [6]
Flag of the German Empire.svg 36,000 POW [7]

The Battle of St Quentin Canal was a pivotal battle of World War I that began on 29 September 1918 and involved British, Australian and American forces operating as part of the British Fourth Army under the overall command of General Sir Henry Rawlinson. Further north, part of the British Third Army also supported the attack. [8] South of the Fourth Army's 19 km (12 mi) front, the French First Army launched a coordinated attack on a 9.5 km (6 mi) front. [9] The objective was to break through one of the most heavily defended stretches of the German Siegfriedstellung (Hindenburg Line), which in this sector used the St Quentin Canal as part of its defences. The assault achieved its objectives (though not according to the planned timetable), resulting in the first full breach of the Hindenburg Line, in the face of heavy German resistance. In concert with other attacks of the Grand Offensive along the length of the line, Allied success convinced the German high command that there was little hope of an ultimate German victory. [10]

Contents

Background

Rawlinson wanted the Australian Corps, under the command of Lieutenant General Sir John Monash, with its well-earned reputation, to spearhead the attack. Monash was unhappy, because his Australian force was by now short of manpower and many soldiers were showing signs of strain, having been heavily engaged in fighting for several months. There had been some episodes of mutiny by troops who were feeling unfairly put upon. [11] Monash was however very pleased when Rawlinson offered him the American II Corps (the U.S. 27th and 30th Divisions), [12] which still remained at the disposal of the British command, since American divisions were twice the numerical strength of their British counterparts. [13] [lower-alpha 2] U.S. Corps commander Major General George Windle Read handed command of his American force for the duration of the action to Monash. [14] [15] However, the American soldiers lacked battle experience. A small group of 217 Australian officers and N.C.O.s was assigned to the U.S. troops for advice and liaison. [16] The British high command considered that German morale was suffering badly and that their capacity to resist was much weakened. [17] Monash believed that the operation would be "more a matter of engineering and organisation than of fighting". [18] Whilst there had been some evidence of poor German morale from previous operations, this proved to be a dangerous assumption. [19]

Monash was tasked with drawing up the battle plan. He would use the Americans to breach the Hindenburg Line and the Australian 3rd and 5th Divisions to follow behind and then exploit the breakthrough. Monash intended to attack the Hindenburg Line south of Vendhuile where the St Quentin Canal runs underground for some 5,500 m (6,000 yd) through the Bellicourt Tunnel (which had been converted by the Germans into an integral part of the Hindenburg Line defensive system). [20] The tunnel was the only location where tanks could cross the canal. Where the canal runs underground, the main Hindenburg Line trench system was sited to the west of the line of the canal. Two British corps, III and IX, would be deployed in support of the main assault. To Monash's plan Rawlinson made a very significant change: IX Corps would launch an assault directly across the deep canal cutting south of the Bellicourt Tunnel. This plan originated with Lieutenant-General Sir Walter Braithwaite, commander of IX Corps. [21] Monash felt such an assault to be doomed to failure and would never have planned for it himself, believing it to be too risky. [21] This view was shared by many in the 46th (North Midland) Division of IX Corps, which was tasked with spearheading the assault. [22] The Germans believed the canal cutting to be impregnable. [23]

Detail of a British trench map of Bellicourt. The canal tunnel is coloured red. The Hindenburg Line runs west of the tunnel and east of the canal cutting. Trench Map 62b.NW (Bellicourt) (detail).jpg
Detail of a British trench map of Bellicourt. The canal tunnel is coloured red. The Hindenburg Line runs west of the tunnel and east of the canal cutting.

Prelude

Map showing the operations of U.S. 27th and 30th Divisions affiliated to Australian Corps as part of British Fourth Army during the Battle of St Quentin Canal, 29 September 1918. The advance shown was actually made by combined American and Australian forces. U.S. II Corps in the Battle of St Quentin Canal 29 September 1918.jpg
Map showing the operations of U.S. 27th and 30th Divisions affiliated to Australian Corps as part of British Fourth Army during the Battle of St Quentin Canal, 29 September 1918. The advance shown was actually made by combined American and Australian forces.
Men of the American 30th Division at rest with German prisoners following the capture of Bellicourt, 29 September 1918. In the background are British Mark V tanks (with 'cribs' for crossing trenches) of the 8th Battalion, Tank Corps, which was one of four battalions of the 5th Tank Brigade allotted to the 5th Australian Division and American Corps for the operation. The Hundred Days Offensive, August-november 1918 Q9365.jpg
Men of the American 30th Division at rest with German prisoners following the capture of Bellicourt, 29 September 1918. In the background are British Mark V tanks (with 'cribs' for crossing trenches) of the 8th Battalion, Tank Corps, which was one of four battalions of the 5th Tank Brigade allotted to the 5th Australian Division and American Corps for the operation.

After the German spring offensive, British Empire, French, and American counterattacks during the Hundred Days Offensive brought the Allies back up against the outposts of the Hindenburg Line by the autumn of 1918, close to the village of Bellicourt, where the Battle of Épehy was fought on 18 September 1918. [17]

Preliminary operation of 27 September

Monash's plan assumed that the Hindenburg outpost line would be in Allied hands by the date set for the start of the battle. Whilst the Australians had already captured it in the southern part of the front (from where the American 30th Division would launch its attack), the northern section of the line was still in German hands. [24] The American 27th Division was ordered to attack on 27 September, [25] to finish clearing German forces from outposts in front of their line, including the strong points of The Knoll, Gillemont Farm, and Quennemont Farm. [26] Commander in Chief Field Marshal Sir Douglas Haig initially opposed using the Americans to take the outpost line, wanting to preserve them for the main attack. He was persuaded by Rawlinson to change his mind. The British III Corps had previously failed to capture the outposts, but that failure had been attributed by Rawlinson to the tiredness of the troops. Rawlinson was convinced that the Germans were at breaking point and managed to persuade Haig that this was so. [27] The American soldiers were inexperienced and problems were compounded by a shortage of American officers (there were only 18 officers in the 12 attacking companies – the remainder were absent receiving further training). [28]

The U.S. attack was unsuccessful. Monash asked Rawlinson for permission to delay the main attack due on 29 September, but this was refused because of the priority given to Marshal Ferdinand Foch's strategy of keeping the Germans under the relentless pressure of coordinated assaults along the front. [29] As a result of the confusion created by the failed attack (with the corps command being unsure of where the American troops were), the battle on 29 September on the American 27th Division front had to be started without the customary (and highly effective) close artillery support. The British artillery commander argued that attempting to alter the barrage timetable at this late stage would cause problems and the American divisional commander Major General John F. O'Ryan was also concerned about the possibility of friendly fire. [30] [lower-alpha 3] All of the Allied commanders therefore agreed to proceed with the original artillery fire plan. [30] The result was that the barrage would now start at the originally-intended jump-off point, some 900 m (1,000 yd) beyond the actual starting point of the infantry, leaving them very vulnerable during their initial advance. 27th Division was required to make an advance greater than any that had been asked of its highly experienced Australian allies, an advance of some 4,500 m (5,000 yd) in a single action. [32] In an attempt to compensate for the lack of a creeping barrage Rawlinson provided additional tanks. [33] However, the absence of a creeping barrage in the 27th Division sector was to have a very detrimental effect on the initial operations of the battle on the front opposite the tunnel. [34]

Soldiers of the 30th American Infantry Division and the 15th Australian Brigade (5th Australian Division) at the southern entrance of the Bellicourt Tunnel at Riqueval near Bellicourt. It was captured by the American 30th Division on 29 September 1918. (Photographed 4 October 1918). The Hundred Days Offensive, August-november 1918 Q9524.jpg
Soldiers of the 30th American Infantry Division and the 15th Australian Brigade (5th Australian Division) at the southern entrance of the Bellicourt Tunnel at Riqueval near Bellicourt. It was captured by the American 30th Division on 29 September 1918. (Photographed 4 October 1918).

Main assault of 29 September

Brigadier General J V Campbell addressing troops of the 137th Brigade (46th Division) from the Riqueval Bridge over the St Quentin Canal Riqueval Bridge 1918.jpg
Brigadier General J V Campbell addressing troops of the 137th Brigade (46th Division) from the Riqueval Bridge over the St Quentin Canal

The battle was preceded by the greatest British artillery bombardment of the war. Some 1,600 guns were deployed (1,044 field guns and 593 heavy guns and howitzers), [35] firing almost 1,000,000 shells over a comparatively short period of time. [36] Included in these were more than 30,000 mustard gas shells (the first use of a British-made version of this weapon). These were specifically targeted at headquarters and groups of batteries. [35] Many of the high explosive shells fired had special fuses which made them very effective in destroying the German barbed wire. [37] The British were greatly helped by the fact that they were in possession of highly detailed captured plans of the enemy defences (especially useful for the IX Corps sector). [20] Monash's battle plan for 29 September envisaged breaking through the main Hindenburg Line defences, crossing the canal tunnel mound, breaching the fortified Le Catelet–Nauroy Line beyond that, and reaching the Beaurevoir Line (the final fortified line) beyond that as the objective on the first day. [24] Monash had originally intended to capture the Beaurevoir Line on 29 September, but Rawlinson removed this as a first day objective, considering it overly ambitious. [38]

King George V at Riqueval Bridge, the scene of the exploit of the 137th Brigade when the 46th Division crossed the St Quentin Canal cutting on 29 September 1918. (photo taken 2 December). Riqueval Bridge IWM Q9353.jpg
King George V at Riqueval Bridge, the scene of the exploit of the 137th Brigade when the 46th Division crossed the St Quentin Canal cutting on 29 September 1918. (photo taken 2 December).

Attack over Bellicourt Tunnel

On 29 September, the two American divisions attacked followed by the two Australian divisions, with approximately 150 tanks of the 4th and 5th Tank Brigades of the British Tank Corps (including the newly trained American 301st Heavy Tank Battalion, which was equipped with British tanks) in support of the four divisions. The objective of the Americans was the Le Catelet-Nauroy Line, a defensive line east of the canal. [39] Here the Australian 3rd Division (behind the U.S. 27th) and 5th Division (behind the U.S. 30th) were intended to "leapfrog" through the American forces and press on towards the Beaurevoir Line. Australian 2nd Division was in reserve. [37]

On the left of the front, where the U.S. 27th Division began at a disadvantage, none of the objectives were met on the first day and the Americans suffered severe losses. The 107th Infantry Regiment suffered the worst casualties sustained in a single day by any U.S. regiment during the war. [40] Rather than leapfrogging through the Americans, the Australian 3rd Division became involved in a desperate fight for positions that should already have been captured had Monash's plan run to timetable. Despite some individual acts of heroism [41] the lack of progress on the left of the front had an adverse effect on the progress of the right of the front too. As the American 30th Division and then the Australian 5th Division moved forward whilst the units to their left did not, they had to contend with German fire from the side and rear as well as from ahead. [42] An added difficulty was thick fog across the battlefield in the earlier stages of the attack which led to American troops passing by Germans without realising that they were there, with the Germans causing severe problems to the Americans following the assault wave. [43] Fog also caused problems for infantry/tank cooperation. [44] [lower-alpha 4] The 30th Division broke through the Hindenburg Line in the fog on 29 September 1918, entering Bellicourt, capturing the southern entrance of Bellicourt Tunnel and reaching the village of Nauroy, where Australian troops joined them to continue the attack. [46]

The advancing Australians came across large groups of leaderless, disoriented Americans. Charles Bean wrote: "By 10 o'clock Monash's plan had gone to the winds.... From that hour onward ... the offensive was really directed by Australian battalion or company commanders at the front..." [47] The 30th Division won the praise of General John J. Pershing, who wrote: "... the 30th Division did especially well. It broke through the Hindenburg Line on its entire front and took Bellicourt and part of Nauroy by noon of the 29th." [48] There has since been considerable debate over the extent to which the American forces were successful. [49] Monash wrote: "...in this battle they demonstrated their inexperience in war, and their ignorance of some of the elementary methods of fighting employed on the French front. For these shortcomings they paid a heavy price. Their sacrifices, nevertheless, contributed quite definitely to the partial success of the day's operations..." [50] The objective of U.S. II Corps, the Catelet–Nauroy Line, was not captured by the Americans. During the battle, Monash was furious about the performance of the American divisions. [51] Late on 29 September Rawlinson wrote: "The Americans appear to be in a state of hopeless confusion and will not, I fear, be able to function as a corps, so I am contemplating replacing them ... I fear their casualties have been heavy, but it is their own fault." [52]

Meanwhile, on the right of the Bellicourt Tunnel front, the Australian 32nd Battalion under the command of Major Blair Wark established contact with the 1/4th Battalion, Leicestershire Regiment, of 46th Division, which had crossed the canal and were now present in force east of the Hindenburg Line. [53]

By this stage in the war the Tank Corps had suffered greatly and there were fewer tanks available for the battle than had been deployed in the Battle of Amiens in August. Eight tanks were destroyed when they strayed into an old British minefield but the 29 September attack also highlighted the high vulnerability of tanks to strong German anti-tank measures. In one instance, four heavy tanks and five medium tanks were destroyed in the space of 15 minutes by German field guns at the same location. [54] This was during the attempt to subdue severe machine gun fire coming from the Le Catelet–Nauroy Line in the vicinity of Cabaret Wood Farm [55] [ page needed ] (a tank fort – see map) and showed the danger posed by German field guns to tanks operating without close infantry support (because the crew had very limited visibility and often could not see a threat which those outside the tank could see). The tanks could protect the infantry but they also needed the close cooperation of the infantry to alert them to the danger of concealed field guns. [56] [ page needed ] In the case of this attack, the machine gun fire was so severe that the infantry were ordered to withdraw, leaving the tanks well forward of them and prey to the German field guns. [57]

Riqueval Bridge in 2003. The canal banks are much more overgrown than when the bridge was captured during the battle Riqueval2.jpg
Riqueval Bridge in 2003. The canal banks are much more overgrown than when the bridge was captured during the battle

Attack across the canal cutting

The attack across the canal cutting, also known as the Battle of Bellenglise, [58] saw IX Corps (commanded by Braithwaite), on the right of the American and Australian Divisions, launch its assault between Riqueval and Bellenglise. [lower-alpha 5] The assault was spearheaded by the British 46th Division under the command of Major-General Gerald Boyd. In this sector the St Quentin Canal formed an immense, ready-made anti-tank "ditch" and the main Hindenburg Line trench system lay on the east (German) side of the canal. IX Corps was supported by tanks of the 3rd Tank Brigade, which had to cross Bellicourt Tunnel in the American 30th Division sector and then move south along the east bank of the canal. [59] IX Corps had to cross the formidable canal cutting (which increased in depth as it approached Riqueval until its very steep banks, strongly defended by fortified machine gun positions, were over 15 m (50 ft) deep in places), [60] and then fight its way through the Hindenburg Line trenches. The 46th Division's final objective for 29 September was a line of high ground beyond the villages of Lehaucourt and Magny-la-Fosse. [61] The British 32nd Division, following behind, would then leapfrog the 46th Division. [62] Following a devastating artillery bombardment (which was heaviest in this sector), [37] and in thick fog and smoke, the 46th Division fought its way through the German trenches west of the canal and then across the waterway. The 137th (Staffordshire) Brigade spearheaded the attack. [63]

The ferocity of the creeping artillery barrage contributed greatly to the success of the assault, keeping the Germans pinned in their dugouts. [64] The soldiers used a variety of flotation aids devised by the Royal Engineers (including improvised floating piers and 3,000 lifebelts from cross-Channel steamers) to cross the water. Scaling ladders were used to climb the brick wall lining the canal. [65] Some men of the 1/6th Battalion, the North Staffordshire Regiment, led by Captain A. H. Charlton, managed to seize the still-intact Riqueval Bridge over the canal before the Germans had a chance to fire their explosive charges. [66] [lower-alpha 6] The 46th Division captured the village of Bellenglise, including its great tunnel/troop shelter (which had been constructed as part of the Hindenburg Line defences). [67] [68] By the end of the day the 46th Division had taken 4,200 German prisoners (out of a total for the army of 5,100) and 70 guns. [69]

The assault across the canal met all of its objectives, on schedule, at a cost of somewhat fewer than 800 casualties to the division. [70] The great success of the day had come where many had least expected it. The 46th Division assault was considered to be one of the outstanding feats of arms of the war. [71] Bean described the attack as an "extraordinarily difficult task" and "a wonderful achievement" in his official Australian war history. [72] Monash wrote that it was "an astonishing success...[which] materially assisted me in the situation in which I was placed later on the same day". [37]

Later in the day the leading brigades of the 32nd Division (including Lt Wilfred Owen of the Manchester Regiment) crossed the canal and moved forward through the 46th Division. The whole of the 32nd Division was east of the canal by nightfall. [73] On the right of the front in IX Corps sector, the 1st Division, operating west of the canal, had the task of protecting the right flank of the 46th Division by clearing the Germans from the ground east and north-east of Pontruet. It met with fierce German resistance and heavy enfilade fire from the south. [63] On the evening of the 29 September orders were issued for IX Corps to seize the Le Tronquoy Tunnel defences to allow the passage of the XV French Corps over the canal tunnel. [74] The following day, the 1st Division advanced under a creeping barrage and early in the afternoon the 3rd Brigade of the division linked up on the tunnel summit with the 14th Brigade of the 32nd Division, which had fought its way forward from the German side of the canal. [75]

Part of British IX Corps sector, showing the St Quentin Canal and the villages of Bellenglise, Magny-la-Fosse, Lehaucourt, Le Tronquoy and Pontruet. The 32nd Division, which had crossed the canal, linked up with the 1st Division (attacking from the Allied side) above the Le Tronquoy canal tunnel. WW1 Trench Map of Maissemy crop.jpg
Part of British IX Corps sector, showing the St Quentin Canal and the villages of Bellenglise, Magny-la-Fosse, Lehaucourt, Le Tronquoy and Pontruet. The 32nd Division, which had crossed the canal, linked up with the 1st Division (attacking from the Allied side) above the Le Tronquoy canal tunnel.

Aftermath

Subsequent fighting

On 2 October, the British 46th and 32nd Divisions, supported by the Australian 2nd Division, planned to capture the Beaurevoir Line (the third line of defences of the Hindenburg Line), the village of Beaurevoir and the heights overlooking the Beaurevoir Line. While the attack succeeded in widening the breach in the Beaurevoir Line, it was unable to seize the high ground further on. However, by 2 October, the attack had resulted in a 17 km breach in the Hindenburg Line. [6]

Continuing attacks from 3 to 10 October (including those by the Australian 2nd Division capturing Montbrehain on 5 October and the British 25th Division capturing the village of Beaurevoir on 5/6 October) managed to clear the fortified villages behind the Beaurevoir Line, and capture the heights overlooking the Beaurevoir Line – resulting in a total break in the Hindenburg Line. [76] [77] The Australian Corps was subsequently withdrawn from the line after the fighting on 5 October, for rest and reorganisation. They would not return to the front before the Armistice on 11 November. [78]

Cemeteries and memorials

Dead American soldiers from the battle were interred in the Somme American Cemetery [79] near Bony, where the missing are also commemorated. The U.S. 27th and 30th Divisions (and those other units which served with the British) are commemorated on the Bellicourt Monument, [80] which stands directly above the canal tunnel. The Australian and British dead were interred in numerous Commonwealth War Graves Commission cemeteries scattered around the area, including Bellicourt British Cemetery; [81] Unicorn Cemetery, Vendhuile [82] and La Baraque British Cemetery, Bellenglise (UK dead only). [83] Australian soldiers with no known grave are commemorated on the Villers-Bretonneux Australian National Memorial [84] and the missing British soldiers killed in the battle are commemorated on the Vis-en-Artois Memorial. [85]

Notes

  1. Bean lists the following German divisions facing the attack: 54th, 121st, 185th, 75th Reserve, 21st, 2nd Guards, 2nd, 119th, 241st, 54th, 24th, 8th and 21st Reserve divisions. Note: this list is incomplete, as it does not include the forces facing the Allies after 5 October. [2]
  2. A number of U.S. divisions had trained in the British sector with British instructors, though Pershing had always resisted having their entire training carried out by the British. The 27th and 30th Divisions were the only ones which Pershing permitted to remain with the British by this time. Both had spent their entire time since arriving in France in the British area. [13]
  3. The two American divisions were reliant on British guns because they did not have their own artillery. [31]
  4. The fog was however helpful to IX Corps. [45]
  5. On the right of the IX Corps front the canal ran through the 1,200-yard (1,100 m) Le Tronquoy Tunnel, but there was no intention to launch an attack across the tunnel in the manner of the planned assault on the Bellicourt Tunnel.
  6. The bridge had not been destroyed previously by the Germans because it was a major link to the ground they held west of the canal.

Footnotes

  1. Boraston 1920, pp. 282–285.
  2. Bean 1942, pp. 984, 985, 986, 995, 1008, 1013, 1027.
  3. Nichols 2004, p. 560.
  4. Scott & Middleton Brumwell 2001, p. 212.
  5. Clodfelter 2002, p. 454.
  6. 1 2 Australian War Memorial.
  7. Boraston 1920, p. 285.
  8. Stacke 1928.
  9. Montgomery 1919, pp. 151–152.
  10. Lloyd 2014, pp. 195–198.
  11. Blair 2011, p. 12.
  12. Bean 1942, p. 942.
  13. 1 2 Yockelson 2008, Chapter 12.
  14. Yockelson 2008, Foreword.
  15. Bean 1942, p. 943.
  16. Monash 1920, Chapter XIV.
  17. 1 2 Stevenson 2012, p. 139.
  18. Blair 2011, p. 9.
  19. Blair 2011, p. 138.
  20. 1 2 Monash 1920, Chapter 13.
  21. 1 2 Terraine 1978, p. 165.
  22. Priestley 1919, p. 23.
  23. Priestley 1919, p. 32.
  24. 1 2 Monash 1920, Chapter 14.
  25. Bean 1942, p. 952.
  26. Yockelson 2008, Chapter 15.
  27. Blair 2011, pp. 8, 138.
  28. Bean 1942, p. 983.
  29. Blair 2011, p. 139.
  30. 1 2 Yockelson 2008, Chapter 17.
  31. Yockelson 2008, Chapter 11.
  32. Blair 2011, p. 8.
  33. Bean 1942, p. 956.
  34. Bean 1942, p. 994.
  35. 1 2 Montgomery 1919, p. 153.
  36. Sheffield 2001, Chapter 9.
  37. 1 2 3 4 Monash 1920, Chapter 15.
  38. Blair 2011, pp. 7–8.
  39. Coulthard-Clark 2001, p. 163.
  40. American Battle Monuments Commission 1938, p. 380.
  41. American Battle Monuments Commission 1938, p. 377.
  42. Bean 1942, p. 966.
  43. American Battle Monuments Commission 1938, p. 378.
  44. Williams-Ellis 1919, p. 252.
  45. Terraine 1978, p. 171.
  46. American Battle Monuments Commission 1938, pp. 378–380.
  47. Bean 1942, p. 995.
  48. Pershing 1931, p. 304.
  49. Bean 1942, p. 972.
  50. Monash 1920, Chapter 17.
  51. Blair 2011, Conclusion.
  52. Yockelson 2008, Chapter 20.
  53. Bean 1942, p. 973.
  54. Terraine 1978, pp. 170–171.
  55. Bean 1942.
  56. Travers 1992.
  57. War Office, Chapter 10, paragraph 10.
  58. Priestley 1919, Chapter 1.
  59. Montgomery 1919, p. 155.
  60. Priestley 1919, pp. 31–32.
  61. Priestley 1919, p. 30.
  62. Priestley 1919, p. 31.
  63. 1 2 Montgomery 1919, p. 158.
  64. Winter 2010, pp. 40–41.
  65. Priestley 1919, pp. 41–42.
  66. "No. 31583". The London Gazette (Supplement). 3 October 1919. p. 12221.
  67. Priestley 1919, pp. 77–78.
  68. Hart 2009, p. 452.
  69. Montgomery 1919, p. 162.
  70. Priestley 1919, Chapter 2.
  71. Terraine 1978, p. 173.
  72. Bean 1942, pp. 973–974.
  73. Montgomery 1919, p. 161.
  74. Montgomery 1919, p. 169.
  75. Montgomery 1919, p. 170.
  76. Terraine 1978, p. 177.
  77. Monash 1920, Chapter 16.
  78. Grey 2008, p. 109.
  79. American Battle Monuments Commission 1938, pp. 387–388.
  80. American Battle Monuments Commission 1938, p. 383.
  81. CWGC Bellicourt.
  82. CWGC Unicorn.
  83. CWGC La Baraque.
  84. CWGC Villers-Bretonneux.
  85. CWGC Vis-en-Artois.

Related Research Articles

<span class="mw-page-title-main">John Monash</span> Australian Army officer (1865–1931)

General Sir John Monash, was an Australian civil engineer and military commander of the First World War. He commanded the 13th Infantry Brigade before the war and then, shortly after its outbreak, became commander of the 4th Brigade in Egypt, with whom he took part in the Gallipoli campaign. In July 1916 he took charge of the newly raised 3rd Division in northwestern France and in May 1918 became commander of the Australian Corps, at the time the largest corps on the Western Front. Monash is considered one of the best Allied generals of the First World War and the most famous commander in Australian history.

<span class="mw-page-title-main">II Corps (United States)</span> Military unit

The II Corps was a corps-sized formation of the United States Army that was active in both World War I and World War II. It was originally formed and fought on the Western Front during World War I and was also the first American formation of any size to see combat in North Africa or Europe during World War II.

<span class="mw-page-title-main">4th Division (Australia)</span> 1916-1944 Australian Army infantry division

The Australian 4th Division was formed in the First World War during the expansion of the Australian Imperial Force (AIF) infantry brigades in February 1916. In addition to the experienced 4th Brigade were added the new 12th and 13th Brigades. From Egypt the division was sent to France, where it took part in the fighting on the Western Front during 1916–1918. After the war ended, the AIF was demobilised and the division was dissolved.

<span class="mw-page-title-main">Battle of Hamel</span> Battle of World War I

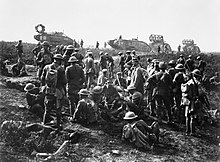
The Battle of Hamel was a successful attack by Australian Army and US Army infantry, supported by British tanks, against German positions in and around the town of Le Hamel, in northern France, during World War I. The attack was planned and commanded by Lieutenant General John Monash, commander of the Australian Corps, and took place on 4 July 1918.

<span class="mw-page-title-main">Hindenburg Line</span> Defensive fortification in World War I

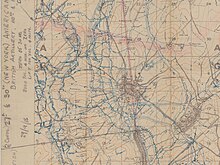
The Hindenburg Line was a German defensive position built during the winter of 1916–1917 on the Western Front during the First World War. The line ran from Arras to Laffaux, near Soissons on the Aisne. In 1916, the Battle of Verdun and the Battle of the Somme left the German western armies exhausted and on the Eastern Front, the Brusilov Offensive had inflicted huge losses on the Austro-Hungarian armies and forced the Germans to take over more of the front. The declaration of war by Romania had placed additional strain on the German army and war economy.

<span class="mw-page-title-main">Henry Rawlinson, 1st Baron Rawlinson</span> British Army general (1864–1925)

General Henry Seymour Rawlinson, 1st Baron Rawlinson,, known as Sir Henry Rawlinson, 2nd Baronet between 1895 and 1919, was a senior British Army officer in the First World War who commanded the Fourth Army of the British Expeditionary Force at the battles of the Somme (1916) and Amiens (1918) as well as the breaking of the Hindenburg Line (1918). He commanded the Indian Army from 1920 to 1925.

<span class="mw-page-title-main">Battle of Amiens (1918)</span> First World War allied offensive operation of August 1918

The Battle of Amiens, also known as the Third Battle of Picardy, was the opening phase of the Allied offensive which began on 8 August 1918, later known as the Hundred Days Offensive, that ultimately led to the end of the First World War. Allied forces advanced over 11 kilometres (7 mi) on the first day, one of the greatest advances of the war, with Gen Henry Rawlinson's British Fourth Army playing the decisive role. The battle is also notable for its effects on both sides' morale and the large number of surrendering German forces. This led Erich Ludendorff to later describe the first day of the battle as "the black day of the German Army". Amiens was one of the first major battles involving armoured warfare.

<span class="mw-page-title-main">Battle of Arras (1917)</span> British offensive during the First World War

The Battle of Arras was a British offensive on the Western Front during the First World War. From 9 April to 16 May 1917, British troops attacked German defences near the French city of Arras on the Western Front. The British achieved the longest advance since trench warfare had begun, surpassing the record set by the French Sixth Army on 1 July 1916. The British advance slowed in the next few days and the German defence recovered. The battle became a costly stalemate for both sides and by the end of the battle, the British Third Army and the First Army had suffered about 160,000 casualties and the German 6th Army about 125,000.

<span class="mw-page-title-main">Blair Wark</span> Australian Victoria Cross recipient

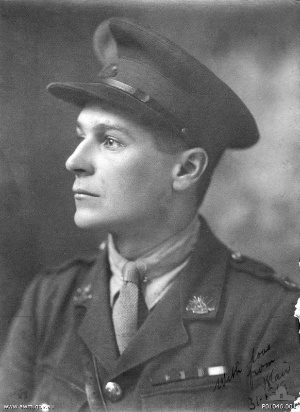
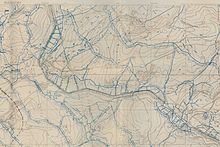
Blair Anderson Wark, was an Australian recipient of the Victoria Cross, the highest decoration for gallantry "in the face of the enemy" that can be awarded to members of the British and other Commonwealth armed forces. A quantity surveyor and member of the Citizens Military Force, Wark enlisted in the Australian Imperial Force on 5 August 1915, for service in the First World War. After initially being employed in the defence of the Suez Canal, his battalion was shipped to the Western Front; it was here that Wark was twice decorated for his bravery and leadership. Having received the Distinguished Service Order in 1917 for his actions at the Battle of Polygon Wood, Wark was awarded the Victoria Cross in 1918 for his leadership and gallantry when in temporary command of his battalion over a three-day period, while conducting operations against the Hindenburg Line.

<span class="mw-page-title-main">Hundred Days Offensive</span> Military campaign during World War I

The Hundred Days Offensive was a series of massive Allied offensives that ended the First World War. Beginning with the Battle of Amiens on the Western Front, the Allies pushed the Imperial German Army back, undoing its gains from the German spring offensive.

<span class="mw-page-title-main">2nd Division (Australia)</span> Formation of the Australian Army

The 2nd Division of the Australian Army commands all the Reserve brigades in Australia. These are the 4th in Victoria and Tasmania, the 5th in New South Wales, the 11th in Queensland, the 13th in Western Australia, and the 8th spread across the country. The division is also responsible for the security of Australia's northern borders through its Regional Force Surveillance Units.

<span class="mw-page-title-main">Second Battle of the Somme</span> 1918 battle on the Western Front of World War I

The Second Battle of the Somme of 1918 was fought during the First World War on the Western Front from late August to early September, in the basin of the River Somme. It was part of a series of successful counter-offensives in response to the German Spring Offensive, after a pause for redeployment and supply.

Canada's Hundred Days is the name given to the series of attacks made by the Canadian Corps between 8 August and 11 November 1918, during the Hundred Days Offensive of World War I. Reference to this period as Canada's Hundred Days is due to the substantial role that Canadian Corps played during the offensive.

<span class="mw-page-title-main">Battle of Épehy</span>

The Battle of Épehy was a battle of the First World War fought on 18 September 1918, involving the British Fourth Army under the command of General Henry Rawlinson against German outpost positions in front of the Hindenburg Line. The village of Épehy was captured on 18 September by the 12th (Eastern) Division.

<span class="mw-page-title-main">5th Division (Australia)</span> Australian Army formation of World War I and II

The 5th Division was an infantry division of the Australian Army which served during the First and Second World Wars. The division was formed in February 1916 as part of the expansion of the Australian Imperial Force infantry brigades. In addition to the existing 8th Brigade were added the new 14th and 15th Brigades, which had been raised from the battalions of the 1st and 2nd Brigades respectively. From Egypt the division was sent to France and then Belgium, where they served in the trenches along the Western Front until the end of the war in November 1918. After the war ended, the division was demobilised in 1919.

<span class="mw-page-title-main">Operation Hush</span> Abortive military operation in First World War

Operation Hush was a British plan to make amphibious landings on the Belgian coast in 1917 during the First World War, supported by an attack from Nieuwpoort and the Yser bridgehead, positions which were a legacy of the Battle of the Yser in 1914. Several plans were considered in 1915 and 1916, then shelved due to operations elsewhere. Operation Hush was intended to begin when the Third Battle of Ypres, the main offensive at Ypres, had advanced to Roulers, Koekelare and Thourout, linked by advances by the French and Belgian armies in between.

<span class="mw-page-title-main">Battle of the Canal du Nord</span>

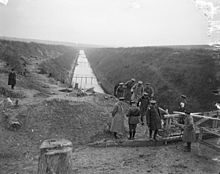
The Battle of Canal du Nord was part of the Hundred Days Offensive of the First World War by the Allies against German positions on the Western Front. The battle took place in the Nord-Pas-de-Calais region of France, along an incomplete portion of the Canal du Nord and on the outskirts of Cambrai between 27 September and 1 October 1918. To prevent the Germans from sending reinforcements against one attack, the assault along the Canal du Nord was part of a sequence of Allied attacks at along the Western Front. The attack began the day after the Meuse-Argonne Offensive commenced, a day before an offensive in Belgian Flanders and two days before the Battle of St. Quentin Canal.

<span class="mw-page-title-main">Battle of Mont Saint-Quentin</span> 1918 battle on the Western Front of World War I

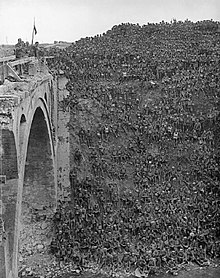
The Battle of Mont Saint-Quentin was a battle on the Western Front during World War I. As part of the Allied Hundred Days Offensive on the Western Front in the late summer of 1918, the Australian Corps crossed the Somme River on the night of 31 August and broke the German lines at Mont Saint-Quentin and Péronne. The British Fourth Army's commander, General Henry Rawlinson, described the Australian advances of 31 August – 4 September as the greatest military achievement of the war. During the battle Australian troops stormed, seized and held the key height of Mont Saint-Quentin, a pivotal German defensive position on the line of the Somme.

<span class="mw-page-title-main">Edward Mann Lewis</span>

Major General Edward Mann Lewis, KCMG, was a highly decorated United States Army officer who served his nation for 46 years. During the First World War, he led the 30th Infantry Division when they broke the Hindenburg Line. Upon arrival in France in 1917, he was placed in command of all U.S. forces in Paris. In 1918 he led the 3rd Brigade of the 2nd Infantry Division at Château-Thierry where he was responsible for planning and leading the attack on the strategic town of Vaux. General John J. Pershing then promoted him and placed him in command of the 30th Infantry Division in July 1918. Assigned to the Fourth British Army, the 30th Division broke the Hindenburg Line on September 29, hastening the end of the Great War.

<span class="mw-page-title-main">5th Pioneer Battalion (Australia)</span> Military unit

The 5th Pioneer Battalion was an Australian infantry and light engineer unit raised for service during the First World War as part of the all volunteer Australian Imperial Force (AIF). Formed in Egypt in March 1916, the battalion subsequently served on the Western Front in France and Belgium, after being transferred to the European battlefields shortly after its establishment. Assigned to the 5th Division, the 5th Pioneer Battalion fought in most of the major battles that the AIF participated in between mid-1916 and the end of the war in November 1918. It was subsequently disbanded in early 1919.

References

Books

Websites