VII Corps (United Kingdom)

Last updated

VII Corps
VII Corps WW1.jpg
VII Corps formation badge during the First World War
Active First World War
Second World War
CountryFlag of the United Kingdom.svg  United Kingdom
Branch Flag of the British Army.svg British Army
TypeField corps
Part of British Expeditionary Force (1915-18)
GHQ Home Forces (1940, 1944-45)
Engagements
Commanders
Notable
commanders
Lt-Gen Sir Thomas D'Oyly Snow KCB KCMG
Lt-Gen Sir Walter Congreve VC KCB MVO

VII Corps was an army corps of the British Army active in the First and Second World Wars. In the early part of the Second World War it was part of the defence forces of the United Kingdom, and later acted as a shadow formation for deception purposes.

Contents

Prior to the First World War

In 1876 a Mobilisation Scheme was published for the forces in Great Britain and Ireland, including eight army corps of the 'Active Army'. The '7th Corps' was to be headquartered at York, formed from Irish and English militia. In 1880 its order of battle was as follows:

This scheme had been dropped by 1881. [2]

First World War

VII Corps formed in France on 14 July 1915 under the command of Lt-General Thomas D'Oyly Snow (previously commander of 27th Division) as part of Sir Charles Monro's Third Army on the Western Front. [1] [3] [4]

Order of Battle of VII Corps 14 July 1915 [5]
General Officer Commanding (GOC): Lt-Gen Sir Thomas D'O. Snow

1916

In 1916 VII Corps remained in Third Army, now commanded by Sir Edmund Allenby. The Corps' first serious action was in the Somme Offensive of 1916, on the first day of which it carried out a disastrous diversionary attack at Gommecourt, in which 46th Division suffered 2455 casualties, and 56th Division 4313, for no permanent gain. [1] [6] [7]

Order of Battle of VII Corps 1 July 1916 [8]
GOC: Lt-Gen Sir Thomas D'O. Snow
GOC, Royal Artillery: Brig-Gen C.M. Ross-Johnson
GOC, Heavy Artillery: Brig-Gen C.R. Buckle
Chief Engineer: Brig-Gen J.A. Tanner

From 10 May 1916 to 16 July 1917, 1st North Irish Horse constituted VII Corps Cavalry Regiment. [9] [10]

1917

When the German Army retreated to the Hindenburg Line in March 1917, VII Corps was the only part of Third Army required to follow up, south of the new line's pivot at Vimy Ridge.

Order of Battle of VII Corps 14 March-5 April 1917 [11]

During the Arras Offensive of April and May 1917, VII Corps was engaged in all three Battles of the Scarpe. During the First Battle of the Scarpe, 9–14 April, it had the same divisions under command, with the addition of 50th (Northumbrian) Division, which captured the Wancourt Ridge. VII Corps then had 30th, 50th and 33rd Division engaged in the Second Battle of the Scarpe, 23–24 April. During the Third Battle of the Scarpe, 3–4 May, it operated with 14th (Light), 14th (Eastern) and 21st Divisions. Finally, for the subsequent actions on the Hindenburg Line, 20 May-16 June, VII Corps had 21st and 33rd Divisions under command. [12]

Later in 1917 the corps fought in the Battle of Cambrai.

1918

In 1918 the command was taken over by Lt-Gen Sir Walter Congreve, VC, KCB, MVO. [4] and the corps fought during Operation Michael and the subsequent victorious British advance of the Hundred Days Offensive that ended the war.

Order of Battle of VII Corps 21 March-23 March 1918

9th Division 16th Division 21st Division 39th Division

Order of Battle of VII Corps 24 March-26 March 1918

9th Division 16th Division 21st Division 35th Division 39th Division 1st Cavalry Division

Order of Battle of VII Corps 27 March-29 March 1918

9th Division 21st Division 35th Division 1st Cavalry Division

Order of Battle of VII Corps 28 March-5 April 1918

9th Division 21st Division 35th Division 1st Cavalry Division 4th Australian Division

Second World War

VII Corps was reformed in the United Kingdom during mid-1940 to control field forces deployed to counter the German invasion threat of that year. On 17 July that year it comprised 1st Canadian Infantry Division, 1st Armoured Division, and 2nd New Zealand Expeditionary Force (UK), a somewhat oversized brigade based on the second NZ echelon of troops (of the 2nd New Zealand Expeditionary Force) which had been diverted to the United Kingdom from Egypt. [13] The Corps was placed under the command of Lieutenant-General Andrew McNaughton, a Canadian Army officer. At the time its allotted task was to 'counter-attack and destroy any enemy force invading the counties of Surrey, Kent, Sussex and Hampshire which was not destroyed by the troops of the Eastern and Southern Commands'. [14]

The Official History of New Zealand in the Second World War 1939–45 writes: [15]

The rest of the echelon spent their time training for their role in the defence of Britain. General Freyberg had given the officers an inspiring survey of the military situation; the press and Mr Churchill warned everyone that each weekend was a potential crisis. And history seemed to be repeating itself with some romantic variations. On 6 July the battalions were inspected by King George VI, and men with imagination and some slight knowledge of history thought of Elizabeth I at Tilbury or of George III reviewing his regiments when they were waiting for the forces of Napoleon.

At this stage the battalions and detachments of reinforcements with the Second Echelon had been organised into 2 NZEF (UK), with a Force Headquarters and three groups. Headquarters Covering Force (Brigadier Miles) had C Squadron of the Divisional Cavalry Regiment, a machine-gun company and an infantry battalion commanded by Lieutenant-Colonel Fraser and made up of the men from the two batteries of 5 Field Regiment and the two batteries of 7 Anti-Tank Regiment that were still without guns. The Mixed Brigade (Brigadier Barrowclough) was formed from 28 (Maori) Battalion and 29 (or Composite) Battalion (Lieutenant-Colonel McNaught) organised from the unattached infantry reinforcements. The third group was 5 Infantry Brigade (Brigadier Hargest). Fourth Anti-Tank Company was attached to the Mixed Infantry Brigade and 5 Anti-Tank Company to 5 Infantry Brigade.

There was still an acute shortage of arms, vehicles and equipment. Fifth Field Regiment had only one battery: a collection of 18-pounder guns and 4.5-inch (110 mm) howitzers. The anti-tank companies had been given the Bedford 30-cwt trucks, sheeted with 58-inch (16 mm) steel plate and equipped with Bren guns and anti-tank rifles. C Squadron Divisional Cavalry had six light tanks and six Bren carriers. The Army Service Corps details, men from the Petrol and Ammunition Companies, had motor lorries, but for the transportation of troops 8 and 9 Motor Coach Companies had been attached from the Royal Army Service Corps. With their enormous camouflaged buses they could lift the whole force in one move.

On 25 December 1940 VII Corps was renamed the Canadian Corps at a time when the threat of German invasion had somewhat dissipated and as the growing number of Canadian troops in the United Kingdom made the formation of a larger Canadian formation advisable. It was based at Headley Court in Surrey. [16]

Later in the war it was notionally reactivated for deception purposes as a formation of the British Fourth Army as part of Operation Fortitude North, the threat to invade Norway at the time of the Normandy landings, with headquarters at Dundee. It was composed of the genuine British 52nd Infantry Division at Dundee, the notional U.S. 55th Division in Iceland, a Norwegian brigade, and three notional U.S. Army Ranger battalions in Iceland, plus corps troops. It moved south with Fourth Army for Fortitude South II, the continuation of the threat to the Pas de Calais, with headquarters at Folkestone in Kent and consisting of the British 61st and 80th divisions and 5th Armoured Division, the latter two notional and the 61st a genuine but low-establishment formation. It notionally moved to East Anglia in September, to Yorkshire in December, and was notionally disbanded in January 1945. Its insignia was a scallop shell on a blue ground.

General Officers Commanding

Commanders included: [17]

Notes

  1. 1 2 3 4 5 6 7 The British Corps of 1914-1918
  2. Army List 1876–1881.
  3. 1 2 Official History 1915, Vol II, pp 86-7.
  4. 1 2 Griffith p 216.
  5. Official History 1915, Vol II, p 87.
  6. Official History 1916, Vol 1, pp 453-75.
  7. Middlebrook pp 82, 123-4, 148, 170-3, 207, 214-6.
  8. Official History 1916, Vol 1, p 453.
  9. Frederick, pp. 22, 32.
  10. James, p. 15.
  11. The German retreat to the Hindenburg Line
  12. The Arras Offensive
  13. McClymont p.36
  14. Newbold, p. 244
  15. "To Greece": Chapter 2: The Second Echelon
  16. "On Guard in Britain, 1940-1941". The Department of National Defense, Government of Canada. Retrieved 13 February 2016.
  17. "Army Commands" (PDF). Archived from the original (PDF) on 5 July 2015. Retrieved 28 June 2015.
  18. Walter Congreve at Oxford Dictionary of National Biography

Related Research Articles

<span class="mw-page-title-main">I Corps (United Kingdom)</span> Inactive British Army formation

I Corps was an army corps in existence as an active formation in the British Army for most of the 80 years from its creation in the First World War until the end of the Cold War, longer than any other corps. It had a short-lived precursor during the Waterloo Campaign. It served as the operational component of the British Army of the Rhine during the Cold War, and was tasked with defending West Germany.

<span class="mw-page-title-main">VIII Corps (United Kingdom)</span> World War-era British Army formation

VIII Corps was a British Army corps formation that existed during the First and Second World Wars. In the latter, it took part in the Normandy Campaign in 1944, where it was involved in Operation Epsom and Operation Goodwood. It would later play a supporting role in Operation Market Garden and finish the war by advancing from the Rhine to the Baltic Sea.

<span class="mw-page-title-main">IV Corps (United Kingdom)</span> Military unit

IV Corps was a corps-sized formation of the British Army, formed in both the First World War and the Second World War. During the First World War the corps served on the Western Front throughout its existence. During the Second World War it served in Norway and Britain until it was transferred to India, which was threatened with attack after Japan entered the war.

<span class="mw-page-title-main">II Corps (United Kingdom)</span> Military unit

The II Corps was an army corps of the British Army formed in both the First World War and the Second World War. There had also been a short-lived II Corps during the Waterloo Campaign.

<span class="mw-page-title-main">III Corps (United Kingdom)</span> Corps of the British Army in the First and Second World Wars

III Corps was an army corps of the British Army formed in both the First World War and the Second World War.

<span class="mw-page-title-main">Essex Yeomanry</span> Military unit

The Essex Yeomanry was a Reserve unit of the British Army that originated in 1797 as local Yeomanry Cavalry Troops in Essex. Reformed after the experience gained in the Second Boer War, it saw active service as cavalry in World War I and as artillery in World War II. Its lineage is maintained by 36 Signal Squadron, part of 71 (Yeomanry) Signal Regiment, Royal Corps of Signals.

<span class="mw-page-title-main">1st Cavalry Division (United Kingdom)</span> World War-era British Army formation

The 1st Cavalry Division was a regular Division of the British Army during the First World War where it fought on the Western Front. During the Second World War it was a first line formation, formed from Yeomanry Regiments. It fought in the Middle East before being converted to the 10th Armoured Division.

<span class="mw-page-title-main">V Corps (United Kingdom)</span> Military unit

V Corps was an army corps of the British Army that saw service in both the First and the Second World Wars. It was first organised in February 1915 and fought through the First World War on the Western front. It was recreated in June 1940, during the Second World War and was substantially reorganised in 1942 for participation in Operation Torch. It fought through the Tunisia Campaign and later the Italian Campaign.

<span class="mw-page-title-main">Queen's Own Oxfordshire Hussars</span> Military unit

The Queen's Own Oxfordshire Hussars (QOOH) was a Yeomanry Cavalry regiment of the British Army's auxiliary forces, formed in 1798. It saw service in the Second Boer War with 40 and 59 Companies of the Imperial Yeomanry and was the first Yeomanry regiment to serve in Belgium and France during the Great War. After almost four years of Trench warfare on the Western Front, where cavalry had been superfluous, the QOOH led the advance during the Allies' victorious Hundred Days Offensive in 1918. In 1922, the QOOHt became part of the Royal Artillery and during World War II it served as anti-tank gunners at Singapore and in North West Europe. After a series of postwar mergers and changes of role, the regiment's lineage is maintained by 142 Vehicle Squadron, Royal Logistic Corps.

<span class="mw-page-title-main">7th (Meerut) Division</span> Military unit

The 7th (Meerut) Division was an infantry division of the Indian Army and before 1895, the Bengal Army, that saw active service during World War I.

<span class="mw-page-title-main">3rd (Lahore) Division</span> Military unit

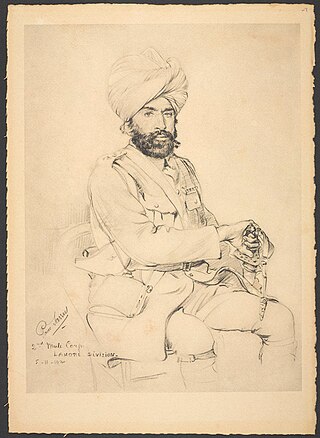
The 3rd (Lahore) Division was an infantry division of the Indian Army and before 1895, the Bengal Army, first organised in 1852. It saw service during World War I as part of the Indian Corps in France before being moved to the Middle East where it fought against troops of the Ottoman Empire.

<span class="mw-page-title-main">South Irish Horse</span> Military unit

The South Irish Horse was a Special Reserve cavalry regiment of the British Army. Formed as an Imperial Yeomanry regiment in 1902 as the South of Ireland Imperial Yeomanry, it perpetuated a unit formed during the Second Boer War. It transferred to the Special Reserve (Cavalry) in 1908 and was renamed as the South Irish Horse. Having taken part in the fighting of World War I, it was disbanded after Irish Independence in 1922.

<span class="mw-page-title-main">Duke of Lancaster's Own Yeomanry</span> Military unit

The Duke of Lancaster's Own Yeomanry (DLOY) was a yeomanry unit of the British Army from 1798 to 1992. Originally raised as part-time cavalry for home defence and internal security, the regiment sent mounted infantry to serve in the Second Boer War. During World War I it carried out mounted duties in Egypt and Palestine and on the Western Front. By 1917 the reserve units at home had become cyclists and the regiment serving on the Western Front joined an infantry battalion, seeing action at the Battle of Passchendaele, against the German Spring Offensive and in the final Allied Hundred Days Offensive. At the beginning of World War II the regiment gave up its horses and formed two regiments of medium artillery, which served in the Middle East, Italy and North West Europe. Postwar it became an armoured unit. Today its lineage is maintained by B Squadron, the Queen's Own Yeomanry.

<span class="mw-page-title-main">Royal Buckinghamshire Yeomanry</span> Military unit

The Royal Buckinghamshire Yeomanry is an Operational Hygiene Squadron of the Royal Logistic Corps, originally formed as cavalry in 1794, and has also served in artillery and signals roles. The lineage is continued by 710 Operational Hygiene Squadron, Royal Logistic Corps.

<span class="mw-page-title-main">1st South African Infantry Brigade</span> South African Army combat formation

The South African 1st Infantry Brigade was an infantry brigade of the army of the Union of South Africa during World Wars I and II. During World War I, the brigade served as a British formation in Egypt and on the Western Front, most famously the Battle of Delville Wood. It was reactivated at the start of the Second World War as a South African formation and served in East Africa and the Western Desert; the brigade disbanded on 1 January 1943.

<span class="mw-page-title-main">XXI Corps (United Kingdom)</span> Military unit

The XXI Corps was an Army Corps of the British Army during World War I. The Corps was formed in Palestine in August 1917 under the command of Lieutenant General Edward Bulfin. It formed part of the Egyptian Expeditionary Force (EEF) and served in the Sinai and Palestine Campaign. At the Battle of Sharon it fought what has been described as 'one of the most overwhelmingly successful operations of the war' and 'a precursor to the modern Blitzkrieg.' It then carried out remarkable march up the coast of modern-day Lebanon as the war came to an end.

<span class="mw-page-title-main">XI Corps (United Kingdom)</span> Military unit

XI Corps was a corps-sized formation of the British Expeditionary Force, active during the First World War that served on the Western Front and in Italy. It was recreated as part of Home Forces defending the United Kingdom during the Second World War.

<span class="mw-page-title-main">VI Corps (United Kingdom)</span> WW1 British Army formation

VI Corps was an army corps of the British Army in the First World War. It was first organised in June 1915 and fought throughout on the Western Front. It was briefly reformed during the Second World War to command forces based in Northern Ireland, but was reorganized as British Forces in Ireland one month later.

The Structure of the Egyptian Expeditionary Force over the course of the First World War is shown below.

References