The battle was the last between British and German big-gun capital ships. The outcome increased the British advantage in major surface units. It was also the penultimate engagement between battleships in history, the last being the October 1944 Battle of Surigao Strait.[1]
Background
Since August 1941, the western Allies had run convoys of ships from the United Kingdom and Iceland to the northern ports of the Soviet Union to provide essential supplies for their war effort on the Eastern Front. These endured much hardship, frequently attacked by German naval and air forces stationed in occupied Norway. A key concern were German Kriegsmarine battleships such as Tirpitz and Scharnhorst. Even the threat of these ships' presence was enough to cause disastrous consequences for the convoys, such as Convoy PQ 17 that was scattered and mostly sunk by German forces after false reports of the Tirpitz sailing to intercept them. To ward off the threat of Germany's capital ships in the Arctic and to escort convoys with a high level of success, the Royal Navy had to outlay great assets.
Operation Ostfront was an attempt by the German Kriegsmarine to intercept the expected Arctic convoys. In late December 1943, there was a Russia-bound convoy JW 55B consisting of 19 cargo vessels under the command of the Commodore, retired Rear-Admiral Maitland Boucher, accompanied by a close escort of two destroyers, HMCSHuron[2] and HMCSHaida,[3] among others, and an ocean escort of eight Home Fleet destroyers led by HMSOnslow. Also in the area was convoy RA 55A, returning to the United Kingdom from Russia, consisting of 22 cargo ships, accompanied by a close escort of two destroyers and four other vessels, and an ocean escort of six Home Fleet destroyers led by HMSMilne. It had arrived safely at Murmansk with its normal escorts and the additional protection by Force 1, commanded by Vice Admiral Robert Burnett, consisting of the cruiser HMSBelfast, the flagship, and the cruisers HMSNorfolk and Sheffield.[4]
Escorting the convoys to Russia was the responsibility of the Home Fleet and its commander-in-chief, Admiral Sir Bruce Fraser. Fraser wished to neutralise Scharnhorst, a major threat to the convoys, and planned a confrontation over Christmas 1943 in which convoy JW 55B would be used to draw the enemy out. Fraser expected and hoped that Scharnhorst would attempt to attack JW 55B. At a conference of the captains of the ships in his force Fraser described his plan to intercept Scharnhorst at a position between the convoy and the enemy's Norwegian base. He would then approach the enemy to within 12,000yd (11,000m) in the Arctic night, illuminate Scharnhorst with star shell, and open fire using fire-control radar.
Convoy JW 55B had left Loch Ewe on 20 December and was sighted two days later by a Luftwaffe aircraft which commenced shadowing. By 23 December it was clear to the British from intelligence reports that the convoy had been sighted and was being shadowed by enemy aircraft. Fraser then put to sea with Force 2 consisting of his flagship the battleship HMSDuke of York, the cruiser HMSJamaica and S-class destroyersHMSSavage, Scorpion, Saumarez, and HNoMSStord of the exiled Royal Norwegian Navy. Fraser was anxious not to discourage Scharnhorst from leaving its base, so did not approach before it was necessary to do so. As JW 55B and its escorts approached the area of greatest danger on the same day, the 23rd, travelling slowly eastward 250mi (220nmi; 400km) off the coast of north Norway, Burnett and Force 1 set out westward from Murmansk while Fraser with Force 2 approached at moderate speed from the west. On 25 December, Scharnhorst (under Captain Fritz Hintze) with the Narvik-class destroyersZ29, Z30, Z33, Z34 and Z38 left Norway's Altafjord under the overall command of KonteradmiralErich Bey. Scharnhorst set course for the convoy's reported position as a south-westerly gale developed.[4]
Battle
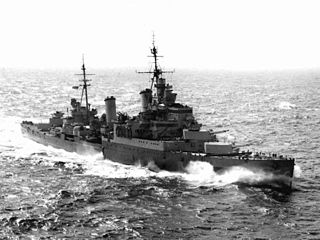
Contemporary map of the battle.British battleship Duke of York
Fraser received confirmation from the Admiralty in the early hours of 26 December that Scharnhorst was at sea and searching for convoy JW 55B. The stormy weather had resulted in the grounding of all Luftwaffe reconnaissance planes. With no ability to search for the British ships from the air and heavy seas hampering the movement of his ships, Rear Admiral Bey was unable to locate the convoy. Despite a German U-boat spotting the convoy and reporting its position, Bey was still not able to make contact with the British ships. Thinking he had overshot the enemy, he detached his destroyers and sent them southward to increase the search area, and the destroyers subsequently lost contact with their flagship. Fraser, preparing for the German attack, had diverted the returning empty convoy RA 55A northward, out of the area in which it was expected, and ordered JW 55B to reverse course to allow him to close. He later ordered four of the destroyers with RA 55A; Matchless, Musketeer, Opportune and Virago, to detach and join him.[5]
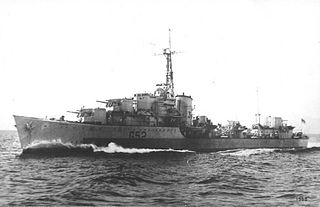
British heavy cruiser Norfolk
The unescorted Scharnhorst encountered Burnett's Force 1 shortly after 09:00. Belfast was the first ship to obtain radar contact on Scharnhorst, and the British cruisers rapidly closed the range. At a distance of nearly 13,000yd (12,000m), the British cruisers opened fire and Scharnhorst responded with her own salvoes. While no hits were scored on the British ships, the German battleship was struck twice, with one shell destroying the forward Seetakt radar controls and leaving Scharnhorst virtually blind in a mounting snowstorm. Without radar, gunners aboard the German battleship were forced to aim at the enemy's muzzle flashes. This was made more difficult because two of the British cruisers were using a new flashless propellant. Bey, believing he had engaged a battleship, turned south in an attempt to distance himself from the pursuers and perhaps draw them away from the convoy.[6]
Scharnhorst's superior speed allowed Bey to shake off his pursuers, after which he turned northeast in an attempt to circle round them and attack the undefended convoy. Burnett, instead of giving chase in sea conditions that were limiting his cruisers' speed to 24kn (44km/h; 28mph), correctly guessed Bey's intentions and positioned Force 1 so as to protect the convoy. It was a decision that he had some personal doubts about as it would result in the cruisers losing contact with Scharnhorst, and the decision was criticised by some of the British force's other officers but supported by Fraser. To Burnett's relief, shortly after noon, Scharnhorst was once again detected by the cruiser's radars as it attempted to approach the convoy. As fire was again exchanged, Scharnhorst scored two hits on Norfolk with 11-inch shells, disabling a turret and her radar.[6] Burnett's destroyers were also unable to get close enough to Scharnhorst to launch a torpedo attack on the German ship. Following this exchange, Bey decided to return to port, while he ordered his destroyers to attack the convoy at a position reported by the U-boat earlier in the morning. The reported position was out of date, and the destroyers missed the convoy.[4]
Scharnhorst ran south for several hours, once again taking advantage of its superior speed. Burnett pursued, but both Sheffield and Norfolk suffered engine problems and were forced to drop back, leaving the outgunned Belfast as the sole pursuer and dangerously exposed for a while. The lack of working radar aboard Scharnhorst prevented the Germans from taking advantage of the situation, allowing Belfast to reacquire the German ship on her radar set. Bey was unaware that his ship was now sailing into a trap, with Admiral Fraser's main force steaming towards Scharnhorst's position and perfectly placed to intercept the fleeing German ship.[6] With Belfast sending a constant stream of radio signals on the Scharnhorst's position, the battleship Duke of York battled through the rough seas to reach the German ship. Fraser sent his four escorting destroyers to press ahead and try to get into torpedo-launching positions. The main British force soon picked up Scharnhorst on radar at 16:15 and were manoeuvring to bring a full broadside to bear. At 16:17 Scharnhorst was detected by Duke of York's Type 273 radar at a range of 45,500yd (41,600m) and by 16:32 Duke of York's Type 284 radar indicated that the range had closed to 29,700yd (27,200m).[7]
At 16:48, Belfast fired star shells to illuminate Scharnhorst which was unprepared, with her turrets trained fore and aft, and clearly visible from Duke of York. Duke of York opened fire at a range of 11,920yd (10,900m) and scored a hit on the first salvo, disabling[8]Scharnhorst's foremost turrets ("Anton" and "Bruno"), while another salvo destroyed the ship's aeroplane hangar.[9] Bey turned north, but was engaged by the cruisers Norfolk and Belfast, and turned east at a high speed of 31kn (36mph; 57km/h). Scharnhorst was now being engaged on one side by Duke of York and Jamaica while Burnett's cruisers engaged from the other side. The Germans took continuing heavy punishment from Duke of York's 14-inch shells, and at 17:24 a desperate Bey signalled to Germany "am surrounded by heavy units".[6]
A close up view of the damage received by HMSSaumarez from an 11-inch shell fired by Scharnhorst during the battle
Bey was able to put some more distance between Scharnhorst and the British ships to increase his prospects of success. Two 11-inch shells from one of her salvoes damaged the foremast of the Duke of York, severing some of the wireless aerials and spraying the superstructure and the upper deck with splinters, and, more serious still, knocking over the radar aerial to the Type 284 gunnery control radar set.[10] These hits could not have been known to Bey, and Lt. Harold Bates, the electrical officer, despite the appalling conditions (a force 8 gale, darkness and substantial ice), climbed the mast and managed to return the aerial to the horizontal and restarted the gyro-stabiliser so that within a few minutes the radar was working again. (After the battle, a myth arose that Bates had repaired the wires with his bare hands, leading to the nickname "Barehand" Bates.)[11]Scharnhorst's fortunes took a dramatic turn for the worse at 18:20 when a shell fired by Duke of York at extreme range pierced her belt armour and destroyed the No. 1 boiler room. Scharnhorst's speed dropped to only 10kn (12mph; 19km/h), and though immediate repair work allowed it to recover to 22kn (25mph; 41km/h),[12]Scharnhorst was now vulnerable to torpedo attacks by the destroyers. Five minutes later, Bey sent his final radio message to the German naval command: "We will fight on until the last shell is fired."[13] At 18:50 Scharnhorst turned to starboard to engage the destroyers Savage and Saumarez, but this allowed Scorpion and the Norwegian destroyer Stord to attack with torpedoes, scoring two hits on the starboard side. As Scharnhorst continued to turn to avoid the torpedoes, Savage and Saumarez scored three hits on her port side. Saumarez was hit several times by Scharnhorst's secondary armament and suffered 11 killed and 11 wounded.
Due to the torpedo hits, Scharnhorst's speed again fell to 10kn (12mph; 19km/h), allowing Duke of York to rapidly close the range.[14] With Scharnhorst illuminated by star shells "hanging over her like a chandelier",[15]Duke of York and Jamaica resumed fire, at a range of only 10,400yd (9,500m). At 19:15, Belfast joined in from the north. The British vessels subjected the German ship to a deluge of shells, and the cruisers Jamaica and Belfast fired their remaining torpedoes at the slowing target. Scharnhorst's end came when the British destroyers Opportune, Virago, Musketeer and Matchless fired a further 19 torpedoes at her. Wracked with hits and unable to flee, Scharnhorst finally capsized and sank at 19:45 on 26 December, her propellers still turning, at an estimated position of 72°16′N28°41′E / 72.267°N 28.683°E / 72.267; 28.683. She was later identified and filmed at 72°31′N28°15′E / 72.517°N 28.250°E / 72.517; 28.250. Of her total complement of 1,968, only 36 were pulled from the frigid waters, 30 by Scorpion and six by Matchless. Neither Rear Admiral Bey nor Captain Hintze were among those rescued (although both were reported seen in the water after the ship sank), nor were any other officers. British casualties, in contrast, were relatively light with only 21 killed and 11 wounded. The majority of British casualties occurred on Saumarez, with 11 of the destroyer's sailors being killed as the ship attempted to close with Scharnhorst. HMS Norfolk suffered most of the remaining casualties with seven of her men being killed while the destroyer Scorpion also had one of its men missing in action.[16] Fraser ordered the force to proceed to Murmansk, making a signal to the Admiralty: "Scharnhorst sunk", to which the reply came: "Grand, well done."
Aftermath
Blindfolded Scharnhorst survivors come ashore at Scapa Flow on 2 January 1944
Later in the evening of 26 December, Admiral Fraser briefed his officers on board Duke of York: "Gentlemen, the battle against Scharnhorst has ended in victory for us. I hope that if any of you are ever called upon to lead a ship into action against an opponent many times superior, you will command your ship as gallantly as Scharnhorst was commanded today".[17] After the battle Admiral Fraser sent the following message to the Admiralty: "... Please convey to the C-in-C Norwegian Navy. Stord played a very daring role in the fight and I am very proud of her...". In an interview in the Evening News on 5 February 1944 the commanding officer of HMS Duke of York, Captain Guy Russell, said: "... the Norwegian destroyer Stord carried out the most daring attack of the whole action...".
The loss of Scharnhorst demonstrated the vital importance of radar in modern naval warfare. While the German battleship should have been able to outgun all of her opponents save the battleship Duke of York, the early loss of radar-assisted fire control combined with the problem of inclement weather left her at a significant disadvantage. Scharnhorst was straddled by 31 of the 52 radar-fire-controlled salvoes fired by Duke of York.[18][pageneeded] In the aftermath of the battle, the Kriegsmarine commander, GroßadmiralKarl Dönitz remarked, "Surface ships are no longer able to fight without effective radar equipment."[19]
The sinking of the Scharnhorst was a major victory for the Allied war effort in the Arctic theatre and further altered the strategic balance at sea in their favour.[20] The Battle of the North Cape took place only a few months after the successful Operation Source, which had severely damaged the German battleship Tirpitz with midget submarines as she lay at anchor in Norway. With Scharnhorst destroyed and Germany's other battleships out of service, the Allies were now for the first time in the war free from the threat of German battleships raiding their convoys in the Arctic and Atlantic. This would allow the Allies to reallocate their naval resources that had been previously tied up to counter the threat of the German 'fleet in being'. This would prove to be the final battle of battleships in European waters and was one of few major surface actions in the Second World War without air support.[1]
HMS Jamaica, a Fiji-class cruiser of the Royal Navy, was named after the island of Jamaica, which was a British Crown Colony when she was built in the late 1930s. The light cruiser spent almost her entire wartime career on Arctic convoy duties, except for a deployment south for the landings in North Africa in November 1942. She participated in the Battle of the Barents Sea in 1942 and the Battle of North Cape in 1943. Jamaica escorted several aircraft carriers in 1944 as they flew off airstrikes that attacked the German battleship Tirpitz in northern Norway. Late in the year she had an extensive refit to prepare her for service with the British Pacific Fleet, but the war ended before she reached the Pacific.
HMS Duke of York was a King George V-class battleship of the Royal Navy. Laid down in May 1937, the ship was constructed by John Brown and Company at Clydebank, and commissioned into the Royal Navy on 4 November 1941, subsequently seeing combat service during the Second World War. In mid-December 1941, Duke of York transported Prime Minister Winston Churchill to the United States to meet President Franklin D. Roosevelt. Between March and September 1942 Duke of York was involved with convoy escort duties, including as flagship of the Heavy Covering Force of Convoy PQ-17, but in October she was dispatched to Gibraltar where she became the flagship of Force H.
The Battle of the Barents Sea was a World War II naval engagement on 31 December 1942 between warships of the German Navy (Kriegsmarine) and British ships escorting convoy JW 51B to Kola Inlet in the USSR. The action took place in the Barents Sea north of North Cape, Norway. The German raiders' failure to inflict significant losses on the convoy infuriated Hitler, who ordered that German naval strategy would henceforth concentrate on the U-boat fleet rather than surface ships.
Admiral Hipper was the lead ship of the Admiral Hipper class of heavy cruisers which served with Nazi Germany's Kriegsmarine during World War II. The ship was laid down at the Blohm & Voss shipyard in Hamburg in July 1935 and launched February 1937; Admiral Hipper entered service shortly before the outbreak of war, in April 1939. The ship was named after Admiral Franz von Hipper, commander of the German battlecruiser squadron during the Battle of Jutland in 1916 and later commander-in-chief of the German High Seas Fleet. She was armed with a main battery of eight 20.3 cm (8 in) guns and, although nominally under the 10,000-long-ton (10,160 t) limit set by the Anglo-German Naval Agreement, actually displaced over 16,000 long tons (16,260 t).
Operation Juno was a German sortie into the Norwegian Sea during the Norwegian Campaign, with the goal of helping the German Army to drive the Allied out of northern Norway and to recapture Narvik. The most notable engagement of the operation was the German battleships Scharnhorst and Gneisenau sinking the British aircraft carrier HMS Glorious and its two escorting destroyers. Several Allied vessels were sunk in other engagements.
HMS Sheffield was one of the Southampton sub class of the Town-class cruisers of the Royal Navy during the Second World War. She took part in actions against several major German warships. Unlike most Royal Navy ships of her time, her fittings were constructed from stainless steel instead of the more traditional brass. This was an attempt to reduce the amount of cleaning required on the part of the crew. Her nickname, the "Shiny Sheff", stemmed from this. A prototype radar system was placed into service in August 1938 on the Sheffield. It was the first vessel in the Royal Navy to be so equipped.
The Scharnhorst class was a class of German battleships built immediately prior to World War II. The first capital ships of Nazi Germany's Kriegsmarine, it comprised two vessels: Scharnhorst and Gneisenau. Scharnhorst was launched first, and is considered to be the lead ship by some sources; they are also referred to as the Gneisenau class in some other sources, as Gneisenau was the first to be laid down and commissioned. They marked the beginning of German naval rearmament after the Treaty of Versailles. The ships were armed with nine 28 cm (11 in) SK C/34 guns in three triple turrets; plans to replace these with six 38 cm (15 in) SK C/34 guns in twin turrets were never realized.
Konteradmiral Erich Bey was a German admiral during World War II. He served as commander of the Kriegsmarine's destroyer forces and commanded the battleship Scharnhorst in the Battle of the North Cape on 26 December 1943, during which he went down with his ship.
HMS Saumarez was an S-class destroyer of the Royal Navy, completed on 1 July 1943. As a flotilla leader, her standard displacement was 20 tons heavier than other ships of her class. She continued the tradition of flotilla leaders being named after prominent British seamen, in her case Vice-Admiral James Saumarez, 1st Baron de Saumarez of the late 18th and early 19th centuries.
HMS Virago was a V-class destroyer of the British Royal Navy that served in World War II. She was later converted into a Type 15 fast anti-submarine frigate, with the new pennant number F76.
HMS Opportune was an O-class destroyer of the Royal Navy. She was ordered from John I. Thornycroft & Company, Woolston on 3 September 1939 for the 1st Emergency Flotilla. She was commissioned on 14 August 1942. She was the second Royal Navy ship borne Opportune.
Convoy JW 55B was an Arctic convoy sent from Great Britain by the Western Allies to aid the Soviet Union during World War II. It sailed in late December 1943, reaching the Soviet northern ports at the end of the month. All ships arrived safely.
Scharnhorst was a German capital ship, alternatively described as a battleship or battlecruiser, of Nazi Germany's Kriegsmarine. She was the lead ship of her class, which included her sister ship Gneisenau. The ship was built at the Kriegsmarinewerft dockyard in Wilhelmshaven; she was laid down on 15 June 1935 and launched a year and four months later on 3 October 1936. Completed in January 1939, the ship was armed with a main battery of nine 28 cm (11 in) C/34 guns in three triple turrets. Plans to replace these weapons with six 38 cm (15 in) SK C/34 guns in twin turrets were never carried out.
Convoy RA 55A was an Arctic convoy during World War II. It was one of a series of convoys run to return Allied ships from Soviet northern ports to ports in Britain. It sailed in late December 1943, reaching British ports at the end of the month. All ships arrived safely.
The action off Lofoten was a naval battle fought between the German Kriegsmarine and the British Royal Navy off the southern coast of the Lofoten Islands, Norway during the Second World War. A German squadron under Vizeadmiral Günther Lütjens consisting of the battleships Scharnhorst and Gneisenau met and engaged a British squadron under Admiral Sir William Whitworth consisting of the battlecruiser HMS Renown and nine destroyers. After a short engagement, Gneisenau suffered moderate damage and the Germans withdrew.
HMS Matchless was a M-class destroyer built during World War II. After the war she was placed in reserve until August 1957 and eventually sold to the Turkish Navy, who renamed her TCG Kılıç Ali Paşa. She was struck from the Turkish Navy list and scrapped in 1971.
Z29 was one of fifteen Type 1936A destroyers built for the Kriegsmarine during World War II. Completed in 1941, she took part in the Channel Dash in early 1942 as flagship of the escort force. Despite this venture to France, the ship spent most of the war in Norwegian waters, escorting German ships and laying minefields. Z29 participated in the indecisive Battle of the Barents Sea at the end of the year, during which she helped to sink a British minesweeper. The ship was damaged during the raid on the island of Spitsbergen in September 1943. Z29 was damaged by British aircraft attacking the battleship Tirpitz in July 1944. The ship escorted troop convoys from northern Norway when the Germans began evacuating the area beginning in October until she began an extensive refit in December.
HMS Scorpion was an S-class destroyer of the Royal Navy, the eleventh of her name, commissioned on 11 May 1943. Initially she was to be named Sentinel, but this was changed following the loss of the Dragonfly-class river gunboatScorpion in the Bangka Strait in February 1942. She served in the Royal Navy during the Second World War, mostly in the Arctic Ocean, and fought in the Battle of North Cape. She was sold to the Netherlands in 1945 and scrapped in 1963.
Håkon Nilsen, Stavanger, Norway, popularly known as "Torpedo Nilsen", was a Norwegian war veteran and highly decorated allied naval torpedo commander of World War II.
HMS Savage was an S-class destroyer of the Royal Navy launched on 24 September 1942. The vessel was adopted by the town of Burton upon Trent. Savage differed from the rest of the class in being fitted with a new 4.5-inch (114 mm) gun, with a twin mounting for the QF Mk III gun forward and two single QF Mk IV guns aft. The twin mount was taken from spares for the aircraft carrier Illustrious. Initially serving as part of the destroyer escort screen for capital ships, Savage joined Operation Camera off the Norwegian coast, an unsuccessful diversionary expedition to distract the enemy from the invasion of Sicily, and escorted King George V from Gibraltar to Scapa Flow. However, for the majority of the ship's career, Savage escorted convoys to the Soviet Union. In December 1943, the destroyer took part in the Battle of the North Cape which saw the destruction of the German battleship Scharnhorst. After the war, Savage was refitted as gunnery training ship. The ship was decommissioned and, on 11 April 1962, sold to be broken up.
References
Bredemeier, Heinrich (1997). Schlactschiff Scharnhorst[Battleship Scharnhorst] (in German). Hamburg: Koehlers Verlag. pp.228–233. ISBN3-7822-0592-8.
Claasen, Adam R. A. (2001). Hitler's Northern War: The Luftwaffe's Ill-Fated Campaign, 1940–1945. Lawrence, KS: University Press of Kansas. pp.228–233. ISBN978-0-7006-1050-1.
Garzke, William H.; Dulin, Robert O. (1985). Battleships: Axis and Neutral Battleships in World War II. Annapolis, MD: Naval Institute Press. ISBN978-0-87021-101-0.
Heogh, Richard (1986). The Longest Battle: The War at Sea 1939-1945. London, UK: Weidenfeld & Nicolson. ISBN0-297-78983-X.
Roskill, Stephen W. (1960). The Offensive Part I, 1st June 1943 – 31st May 1944. History of the Second World War. United Kingdom Military Series. The War at Sea 1939–1945. Vol.III. London: Her Majesty's Stationery Office. OCLC179730439.
Watts, Antony J. (1972). The Loss of the Scharnhorst. London: Allan. ISBN0-7110-0141-3.
This page is based on this Wikipedia article Text is available under the CC BY-SA 4.0 license; additional terms may apply. Images, videos and audio are available under their respective licenses.