Second Battle of Villers-Bretonneux

Last updated
Second Battle of Villers-Bretonneux
Part of Operation Michael (German spring offensive)
Battle of Amiens Hundred Days Offensive.jpg
1918 map showing vicinity of Villers-Bretonneux
Date24–25 April 1918
Location
Villers-Bretonneux, Northern France
49°52′03″N2°31′15″E / 49.86750°N 2.52083°E / 49.86750; 2.52083
Result Allied victory
Belligerents

Flag of the United Kingdom.svg  British Empire

Flag of France (1794-1958).svg  France

Flag of the German Empire.svg German Empire
Commanders and leaders
Flag of France (1794-1958).svg Ferdinand Foch
Flag of the United Kingdom.svg Douglas Haig
Flag of the United Kingdom.svg Henry Rawlinson
Flag of Australia (converted).svg Harold Edward Elliott
Flag of Australia (converted).svg Thomas William Glasgow
Flag of Australia (converted).svg Talbot Hobbs
Flag of the German Empire.svg Erich Ludendorff
Flag of the German Empire.svg Crown Prince Rupprecht of Bavaria
Flag of the German Empire.svg Georg von der Marwitz
Strength
Australian 13th, 14th and 15th Brigades
173rd Brigade of British 58th Division
Remnants of British 8th Division
Moroccan Division
3 Mark IV tanks (one male, two female)
7 Medium Mark A Whippet tanks
228th Infantry Division
4th Guards Infantry Division
13 A7V tanks
Casualties and losses
Flag of Australia (converted).svg 2,473
Flag of the United Kingdom.svg 9,529
Flag of France (1794-1958).svg 3,470
c.10,400
France location map-Regions and departements-2016.svg
Red pog.svg
Villers Bretonneux
Villers-Bretonneux, a commune in the Somme department of northern France

The Second Battle of Villers-Bretonneux (also Actions of Villers-Bretonneux, after the First Battles of the Somme, 1918) took place from 24 to 27 April 1918, during the German spring offensive to the east of Amiens. It is notable for being the first occasion on which tanks fought against each other; it was the biggest and most successful tank action of the German army in the First World War.

Contents

Three German A7Vs engaged three British Mark IV tanks, two of which were female tanks armed only with machine-guns. The two Mark IV females were damaged and forced to withdraw but the male tank, armed with 6-pounder guns, hit and disabled the lead A7V, which was then abandoned by its crew. The Mark IV continued to fire on the two remaining German A7Vs, which withdrew. The "male" then advanced with the support of several Whippet light tanks which had arrived, until disabled by artillery fire and abandoned by the crew.

A counter-attack by two Australian brigades and a British brigade during the night of 24 April partly surrounded Villers-Bretonneux and on 25 April the town was recaptured. On 26 April, the role of the Moroccan division of the French army was crucial in pushing back German units. Australian, British and French troops had almost restored the original front line by 27 April. [lower-alpha 1]

Prelude

In late 1917 and early 1918, the end of the fighting on the Eastern Front allowed the Germans to transfer large numbers of men and equipment to the west. [2] Buoyed by this, but concerned that the entry of the United States into the war would negate their numerical advantage if they did not attack quickly, and that massed tank attacks like that at Cambrai in November 1917 had made more areas vulnerable to attack, the German commander, Erich Ludendorff, chose to use his temporary numerical advantage to punch through the front line and advance north towards the sea. In March, the Germans launched the Spring Offensive, against the British Third and Fifth Armies on the Somme, which were understrength due to the small numbers of replacements being sent from Britain. [3]

In unfinished defences, the Fifth Army was forced back quickly after the first two days, as the Germans advanced under a heavy bombardment of high explosives and gas. As the Germans advanced steadily west, the Third Army also fell back on its southern flank and the crucial railhead at Amiens was threatened with capture; Paris was bombarded by long-range guns. [4] The Allies moved reinforcements to the Somme front and by the end of May, the German advance of the 1918 Battle of the Somme had been halted in front of Hamel. In preparation for a further attack, German railway construction companies were brought up and work undertaken to repair damaged railways in the captured ground. [3]

In early April, the Germans renewed their efforts, simultaneously beginning the Battle of the Lys in Flanders. [5] The Germans managed to advance towards Villers-Bretonneux, a town on the high ground to the south of the Somme River. The terrain allowed artillery observers to see bombardments on Amiens, which was only 16 kilometres (9.9 mi) away, which was of great tactical value. On 4 April, the Germans attempted to capture the town with 15 divisions but were repulsed by troops from the British 1st Cavalry Division and Australian 9th Brigade during the First Battle of Villers-Bretonneux with the help of the Canadians. [3] [6] After the first battle, the forces that had secured the town were relieved and by late April the area around Villers-Bretonneux was largely held by the 8th Division. [7] Although it had been one of the best British divisions it had suffered badly in the German attacks of March, losing 250 officers and about 4,700 men, reducing its infantry by half. Replacements in the latest draft from Britain included 18-year-olds with little training. [8]

Battle

German 2nd Army attack

On 17/18 April, the Germans bombarded the area behind Villers-Bretonneux with mustard gas, causing 1,000 Australian casualties. [3] [9] On the evening of 23/24 April, an artillery barrage was fired, using mustard gas and high explosive rounds. Next morning, the Germans attacked the village with four divisions. [3] [9] The German infantry, with thirteen supporting A7V tanks, broke through the 8th Division, making a 3-mile (4.8 km) wide gap in the Allied line. [10] Villers-Bretonneux fell to the Germans and the railway junction of Amiens became vulnerable to capture. [11] After the Germans took Villers-Bretonneux, the first engagement between opposing tanks took place. Three British Mark IV tanks from No. 1 Section, A Company, 1st Battalion, Tank Corps had been dispatched to the Cachy switch line, at the first reports of German advance and were to hold it against the Germans. [12] One was a "male" (the No. 1 Tank of the section) armed with two 6-pounder guns and machine guns, under the command of Lieutenant Frank Mitchell. It was crewed by only four of the normal crew of eight, as the others had been gassed. The other tanks were "females" armed with 0.303 in (7.7 mm) machine-guns, for use against infantry. [13] All were advancing when they encountered a German A7V, "Nixe" of Abteilung III Imperial German Tank Force, commanded by 2nd Lieutenant Wilhelm Biltz. [13] [14]

A7V tank at Roye, 21 March 1918 Bundesarchiv Bild 183-P1013-316, Westfront, deutscher Panzer in Roye.jpg
A7V tank at Roye, 21 March 1918
Mephisto, German tank now held in the Queensland Museum (1)Mephisto001.jpg
Mephisto, German tank now held in the Queensland Museum

Nixe fired on the two "females", damaging them to the extent that it left holes in the hull leaving the crew exposed. Both retreated; their machine guns were unable to penetrate the armour on the German tank. Mitchell's "male" Mark IV continued to fire at the A7V, while on the move to avoid German artillery fire and the gun of the German tank. The movement meant Mitchell's gunner had difficulty in aiming the 6-pounders. The tanks fired at each other on the move, until the Mark IV stopped to allow the gunner a clear shot and the gunner scored three hits (a total of six shell hits). [15] Nixe heeled over on its side, possibly as a result of crossing an incline at the wrong angle. [14] The surviving German crew (out of 18 men), including Biltz, alighted from the vehicle and the British fired at them as they fled on foot, killing nine. [16]

The British tank was next faced by two more A7Vs, supported by infantry; Mitchell's tank fired several ranging shots at the German tanks and they retreated. Mitchell's tank continued to attack the German infantry, firing case-shot. Seven of the new British Whippet medium tanks arrived, attacked the Germans, encountered some battalions "forming up in the open" and killed many infantry with their machine-guns and by running them down. Mitchell later remarked that when they returned their tracks were covered with blood. Only four of the seven Whippets came back, the rest were destroyed by artillery and five crew were killed. [17]

Being the last tank on the field and slow moving, the Mark IV became a target for German artillery and Mitchell ordered the tank back, manoeuvring to try to avoid the shells but a mortar round disabled the tracks. The crew left the tank, escaping to a British-held trench, much to the surprise of the troops in it. [13] Leutnant Biltz and his crew re-boarded "Nixe" and attempted to return to their base, but had to abandon the vehicle again when the engines failed. Attempts by the Germans to recover it were unsuccessful, and it was blown up by a demolition crew during the night of April 23–24. Earlier in the day, another A7V, No 506 "Mephisto", became ditched in a crater and was abandoned by its crew. It was recovered by British and Australian troops some three months later, and is now held at the Queensland Museum. [18] [lower-alpha 2]

Fourth Army counter-attack

A captured "female" Mark IV tank C14 in 1917 Bundesarchiv Bild 146-1998-098-10, Bei Cambrai, erbeuteter englischer Panzer.jpg
A captured "female" Mark IV tank C14 in 1917

About noon the 1st Battalion of the Sherwood Foresters had attempted a counter-attack. The British 25th Brigade was considered for an attack but this was cancelled. [21] A tank with troops from the 2nd Royal Berkshire Regiment made a spontaneous attack from the north, pushing the German line back about 150 yards (140 m). [22] General Henry Rawlinson had responded even before he received orders from Marshal Ferdinand Foch to recapture the town. [23] At 9:30 a.m. he ordered an immediate counter-attack by the Australian 13th Brigade under Brigadier General Thomas William Glasgow and the 15th Brigade under Brigadier General H. E. "Pompey" Elliott, both in reserve, though the 13th Brigade had suffered many casualties at Dernancourt nearby. Rawlinson intended an enveloping attack, the 15th Brigade attacking north of the town and the 13th Brigade attacking to the south. British troops would support and the 2nd Battalion, Northamptonshire Regiment and the 22nd Durham Light Infantry would follow through in the gap between the Australians and "mop up" the town, once it was isolated. Artillery support was available but since German positions were unknown and to avoid alerting the Germans, there was no preparatory barrage to soften up the German positions. Instead the artillery would bombard the town for the hour once the attack began and then move its line of fire back beyond the line held by the Allies before the German attack. [24]

Meanwhile, the 14th Brigade held its positions to the north, and provided guides to the 15th Brigade. [25] The attack took place on the night of 24/25 April, after a postponement from 8:00 p.m. Glasgow argued that it would still be light, with terrible consequences for his men and that the operation should start at 10:00 p.m. and "zero hour" was eventually set for 10:00 p.m. The operation began with German machine gun crews causing many Australian casualties. A number of charges against machine-gun posts helped the Australian advance; in particular, Lieutenant Clifford Sadlier of the 51st Battalion, was awarded the Victoria Cross, after attacking with hand-grenades. The two brigades swept around Villers-Bretonneux and the Germans retreated, for a while escaping the pocket along a railway cutting. The Australians eventually captured the German positions and pushed the German line back, leaving the German troops in Villers-Bretonneux surrounded. The British units attacked frontally and suffered many casualties. By 25 April, the town had been recaptured and handed back to the villagers. [26] The battle was a great success for the Allies, who had defeated the German attempt to capture Amiens and recaptured Villers-Bretonneux while outnumbered; the village remained in Allied hands to the end of the war. [1]

Role of the Moroccan Division

According to Romain Fathi, in New Directions in War and History, the role of the Moroccan Division at the Second Battle of Villers-Bretonneux has been neglected by Australian popular historians. On 26 April, the French Moroccan Division attacked south of the town and rescued the Australian 51st and 52nd Battalions. [27]

The personal diaries of journalist Charles Bean and a later account of the battle by the commanding officer of the 52nd Battalion, Lt. Colonel J. L. Whitham describe myriad problems arising from this being the first time the Australians and French had fought together on the Western Front. In particular, with the way each defended newly occupied ground and in the manner that the French expected to undertake relief of the Australian line. [28]

While costly, the attack of the Moroccan division was a success, pushing the line further east than Australian troops had due to the strong German resistance they had encountered. The Moroccan Division's contribution to Second Villers-Bretonneux was crucial to the success of the whole operation. For its engagement, the 8e régiment de marche de zouaves of the Moroccan division was awarded a Légion d’honneur by the French President with the following citation: "The year 1918 finds them ready, once again, for all acts of boldness and all sacrifices. On 26 April they attacked Villers-Bretonneux and blocked the road to Amiens". [27]

Aftermath

Analysis

Fighting continued in Villers-Bretonneux and the vicinity for months after the counter-attack. The Australians spent Anzac Day in hand-to-hand fighting and the town was not secured until 27 April with the contribution of the French Moroccan Division. [3] On 3 May an attack by the Australian 12th Brigade towards Monument Wood south-east of Villers-Bretonneux failed, with the 48th Battalion losing over 150 men. [7] The German offensive in the Australian sector ended in late April. As the Germans turned their attention to the French sectors in May and June, a lull occurred on the Somme, during which the Australians exploited their success at Villers-Bretonneux by conducting "peaceful penetration" operations, that slowly advanced the front eastwards. [29] [30]

French historian Romain Fathi has written that "In the case of Villers-Bretonneux for example, Australian accounts have significantly over-estimated the significance of the town for they have failed to consider the much fiercer German push at Moreuil and Bois Sénécat, a few kilometres further south. Broadening the front under consideration, from Albert to Montdidier and looking at the German push therein, would relativise the strategic importance of Villers-Bretonneux". [31]

As the German offensive ended on the Marne in early July, more fighting took place around Villers-Bretonneux, as part of diversionary moves by the Australians in support of the Battle of Hamel. [32] Corporal Walter Brown, of the 20th Battalion, received the Victoria Cross for his actions. [33] Later in the month, the 25th Battalion and 26th Battalion of the 7th Brigade attacked around Monument Wood; for his actions during the assault and German counter-attack, Lieutenant Albert Borella of the 26th Battalion received the Victoria Cross. [34] [35] After the Anzac Day counter-attack, British and French commanders lavished praise upon the Australians, who were all volunteers. Brigadier-General George Grogan, a witness, later wrote that it was "perhaps the greatest individual feat of the war" for troops to attack at night, across unfamiliar ground, at short notice and with no artillery preparation. [36] [3]

These factors had proved essential to the Australian success. [9] Foch spoke of their "astonishing valiance [sic]..." and General Sir Henry Rawlinson attributed the safety of Amiens to the "...determination, tenacity and valour of the Australian Corps". [3] [37] After the battle, the worst examples of looting by AIF soldiers of the war occurred. [38] In 2011, King wrote that one culprit was Barney Hines, the "Souvenir King" of the AIF, who was something of a celebrity. According to King, Hines raided a number of houses, looting alcohol and expensive clothes, with which he threw a party for his friends that ended abruptly when the Germans shelled the house, wounding Hines and several others. King wrote that the Australians shared rations with French civilians in the town. [39] Due to the coincidence of the day in which the counter-attack occurred, the battle holds a significant place in Australian military history, nevertheless it was a combined Allied effort. [37]

Casualties

The fighting around Villers-Bretonneux in April resulted in the following Allied casualties: the Australian brigades had taken 2,473 casualties, British casualties were 9,529 and French losses were c.3,500. German losses were 8,000–10,400 men. [40]

Memorial

In the 1930s an impressively towering memorial was established at the top of the Villers-Bretonneux Military Cemetery to honour the Australian soldiers who fell in France in the Great War. The cemetery is located between Villers-Bretonneux and Fouilloy on the hill (belonging to the latter but overlooking the former) from which the famous night attack was launched. Some 10 miles (16 km) east of Amiens and north of the Roman road to St-Quentin, it rises gently to a plateau overlooking Amiens, the Somme valley and the town. The cemetery contains 2,000 graves, of which 779 are Australian. [41] A further ten Australian casualties of the battle are buried in the Villers-Bretonneux Communal Cemetery. [42] The smaller Crucifix Corner British Military Cemetery just east of the town, in the shadow of a motorway embankment, contains the graves of Australian, British and French metropolitan and colonial (Moroccan) troops, the former including many Australians who fell in the area in fighting, which moved further to the east only on 8 August 1918 (but from then on rapidly). [43] The victory gained at Villers-Bretonneux on the third anniversary of the Gallipoli landings is yearly commemorated by Australians. In 2008, to mark the ninetieth anniversary, the Australian and New Zealand Anzac Day dawn service was held for the first time on the Fouilloy Hill, as well as the traditional one held on the Gallipoli Peninsula. [44]

Notes

  1. German units engaged: I, II and III Sturmpanzerwagen Abteilungen, 228th Division, 4th Guard Division, 77th Reserve Division, 208th Division and Guard Ersatz Division. In reserve: 19th Division, 9th Bavarian Reserve Division and the Jäger Division. Allied divisions engaged: parts of the 4th and 5th Australian divisions, parts of the 58th, 8th, 18th divisions, French 131st and Moroccan divisions. [1]
  2. Mephisto was later recovered by troops from the Australian 26th Battalion and the British 1st Gun Carrier Company; after the war the tank was taken back to Australia as a souvenir. [19] It is the only surviving German World War I tank and is preserved at the Queensland Museum in Brisbane, Australia. [20]

Footnotes

  1. 1 2 Edmonds, Davies & Maxwell-Hyslop 1995, p. 405.
  2. Baldwin 1962, p. 126.
  3. 1 2 3 4 5 6 7 8 Laffin 1992, p. 133.
  4. Baldwin 1962, pp. 140–141.
  5. Baldwin 1962, p. 142.
  6. Coulthard-Clark 1998, pp. 139–140.
  7. 1 2 Coulthard-Clark 1998, p. 145.
  8. Bean 1995, pp. 539–540.
  9. 1 2 3 King 2011, p. 179.
  10. Messenger 1988, p. 10.
  11. Edmonds, Davies & Maxwell-Hyslop 1995, pp. 389–393.
  12. Edmonds, Davies & Maxwell-Hyslop 1995, pp. 392–393.
  13. 1 2 3 Williams-Ellis & Williams-Ellis 1919, p. 262.
  14. 1 2 Foley 1967.
  15. Edmonds, Davies & Maxwell-Hyslop 1995, p. 392.
  16. Williams-Ellis & Williams-Ellis 1919, pp. 262–263.
  17. Williams-Ellis & Williams-Ellis 1919, p. 263.
  18. Edmonds, Davies & Maxwell-Hyslop 1995, p. 390.
  19. Morgan 2014, pp. 24–27.
  20. "Mephisto". Queensland Museum . Retrieved 7 August 2014.
  21. Edmonds, Davies & Maxwell-Hyslop 1995, p. 394.
  22. Bean 1995, p. 567.
  23. Bean 1995, p. 557.
  24. Edmonds, Davies & Maxwell-Hyslop 1995, pp. 394–399.
  25. Bean 1995, p. 578.
  26. Edmonds, Davies & Maxwell-Hyslop 1995, pp. 399–403.
  27. 1 2 Fathi 2017, pp. 53–71.
  28. Chatwin 2019, pp. 49–50.
  29. Baldwin 1962, p. 143.
  30. Grey 2008, p. 108.
  31. Fathi 2017, pp. 69–70.
  32. Baldwin 1962, pp. 143–145.
  33. King 2011, p. 190.
  34. Laffin 1992, pp. 133–134.
  35. Morgan 2014, pp. 24–25.
  36. Bean 1995, p. 638.
  37. 1 2 King 2011, p. 183.
  38. Stanley 2010.
  39. King 2011, pp. 184–185.
  40. Bean 1995, p. 637.
  41. Smith 2010, pp. 133–134.
  42. Laffin 1992, p. 142.
  43. "Crucifix Corner Cemetery". Commonwealth War Graves Commission. Retrieved 5 August 2014.
  44. Smith 2010, pp. 1–2.

Related Research Articles

<span class="mw-page-title-main">II Corps (United States)</span> Military unit

The II Corps was a corps-sized formation of the United States Army that was active in both World War I and World War II. It was originally formed and fought on the Western Front during World War I and was also the first American formation of any size to see combat in North Africa or Europe during World War II.

<span class="mw-page-title-main">A7V</span> German World War I heavy tank

The Sturmpanzerwagen A7V was a heavy tank introduced by Germany in 1918 during World War I. One hundred chassis were ordered in early 1917, ten to be finished as fighting vehicles with armoured bodies, and the remainder as Überlandwagen cargo carriers. The number to be armoured was later increased to 20. They were used in action from March to October 1918, and were the only tanks produced by Germany in World War I to be used in combat, as well as being the first operational German Tank. It was developed as a response to British tanks. Although the A7V is generally considered to be better designed compared to its counterparts, it struggled to procure high production numbers due to its relative complexity and high cost.

<span class="mw-page-title-main">Battle of Hamel</span> Battle of World War I

The Battle of Hamel was a successful attack by Australian Army and US Army infantry, supported by British tanks, against German positions in and around the town of Le Hamel, in northern France, during World War I. The attack was planned and commanded by Lieutenant General John Monash, commander of the Australian Corps, and took place on 4 July 1918.

<span class="mw-page-title-main">Battle of Amiens (1918)</span> First World War allied offensive operation

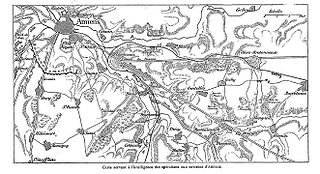
The Battle of Amiens, also known as the Third Battle of Picardy, was the opening phase of the Allied offensive which began on 8 August 1918, later known as the Hundred Days Offensive, that ultimately led to the end of the First World War. Allied forces advanced over 11 kilometres (7 mi) on the first day, one of the greatest advances of the war, with Gen Henry Rawlinson's British Fourth Army and Gen Marie Eugène Debeney's French First Army playing the decisive role. The battle is also notable for its effects on both sides' morale and the large number of surrendering German forces. This led Erich Ludendorff to later describe the first day of the battle as "the black day of the German Army". Amiens was one of the first major battles involving armoured warfare.

<span class="mw-page-title-main">2nd Division (Australia)</span> One of two divisions of the Australian Army

The 2nd Division of the Australian Army, also known as the 2nd (Australian) Division, commands all the Reserve brigades in Australia. These are the 4th in Victoria and Tasmania, the 5th in New South Wales, the 11th in Queensland, the 13th in Western Australia, and the 8th spread across the country. The division is also responsible for the security of Australia's northern borders through its Regional Force Surveillance Units.

<span class="mw-page-title-main">Battle of St Quentin Canal</span> 1918 battle on the Western Front of World War I

The Battle of St Quentin Canal was a pivotal battle of World War I that began on 29 September 1918 and involved British, Australian and American forces operating as part of the British Fourth Army under the overall command of General Sir Henry Rawlinson. Further north, part of the British Third Army also supported the attack. South of the Fourth Army's 19 km (12 mi) front, the French First Army launched a coordinated attack on a 9.5 km (6 mi) front. The objective was to break through one of the most heavily defended stretches of the German Siegfriedstellung, which in this sector used the St Quentin Canal as part of its defences. The assault achieved its objectives, resulting in the first full breach of the Hindenburg Line, in the face of heavy German resistance. In concert with other attacks of the Grand Offensive along the length of the line, Allied success convinced the German high command that there was little hope of an ultimate German victory.

<span class="mw-page-title-main">Mephisto (tank)</span> Last surviving German A7V tank (WWI-era)

Mephisto is a World War I German tank, the only surviving example of an A7V. In April 1918, during a German attack at Villers-Bretonneux on the Western Front, it became stuck in a shell-hole and was abandoned by its crew. It was recovered by Allied troops about three months later and, after the war, taken to Australia as a trophy. Mephisto is housed at the Queensland Museum, in Brisbane, in the Anzac Legacy Gallery. It is not in running order.

The Battle of the Avre, part of the First Battle of Villers-Bretonneux, constituted the final German attack towards Amiens in World War I. It was the point at which the Germans got the closest to Amiens. It was fought between attacking German troops and defending Australian and British troops. The attack was an attempt to take Amiens, where other aspects of Operation Michael had failed. The Avre marked the beginning of the end for Ludendorf's German spring offensive.

<span class="mw-page-title-main">5th Division (Australia)</span> Australian Army formation of World War I and II

The 5th Division was an infantry division of the Australian Army which served during the First and Second World Wars. The division was formed in February 1916 as part of the expansion of the Australian Imperial Force infantry brigades. In addition to the existing 8th Brigade were added the new 14th and 15th Brigades, which had been raised from the battalions of the 1st and 2nd Brigades respectively. From Egypt the division was sent to France and then Belgium, where they served in the trenches along the Western Front until the end of the war in November 1918. After the war ended, the division was demobilised in 1919.

<span class="mw-page-title-main">Battle of Amiens (1870)</span> 1870 battle of the Franco-Prussian War

The Battle of Amiens, also known as the Battle of Villers-Bretonneux, was fought on 27 November 1870 between French and Prussian forces during the Franco-Prussian War (1870–1871). It ended in a Prussian victory, forcing the French to retreat and allowing the Prussians to capture Amiens, France.

<span class="mw-page-title-main">First Battle of Villers-Bretonneux</span> World War I battle

The First Battle of Villers-Bretonneux, took place during Operation Michael, part of the German spring offensive on the Western Front. The offensive began against the British Fifth Army and the Third Army on the Somme and pushed back the British and French reinforcements on the north side of the Somme. The capture of Villers-Bretonneux, close to Amiens, a strategically important road- and rail-junction, would have brought the Germans within artillery-range. In late March, Australian troops were brought south from Belgium as reinforcements to help shore up the line and in early April the Germans launched an attack to capture Villers-Bretonneux. After a determined defence by British and Australian troops, the attackers were close to success until a counter-attack by the 9th Australian Infantry Brigade and by British troops, late in the afternoon of 4 April, restored the line and halted the German advance on Amiens.

<span class="mw-page-title-main">Battle of Courtrai (1918)</span> Battle of the Hundred Days Offensive of World War I

The Battle of Courtrai was one of a series of offensives in northern France and southern Belgium that took place in late September and October 1918.

<span class="mw-page-title-main">Operation Michael</span> 1918 German offensive during World War I

Operation Michael was a major German military offensive during the First World War that began the German Spring Offensive on 21 March 1918. It was launched from the Hindenburg Line, in the vicinity of Saint-Quentin, France. Its goal was to break through the Allied (Entente) lines and advance in a north-westerly direction to seize the Channel Ports, which supplied the British Expeditionary Force (BEF), and to drive the BEF into the sea. Two days later General Erich Ludendorff, the chief of the German General Staff, adjusted his plan and pushed for an offensive due west, along the whole of the British front north of the River Somme. This was designed to first separate the French and British Armies before continuing with the original concept of pushing the BEF into the sea. The offensive ended at Villers-Bretonneux, to the east of the Allied communications centre at Amiens, where the Allies managed to halt the German advance; the German Army had suffered many casualties and was unable to maintain supplies to the advancing troops.

<span class="mw-page-title-main">98th Brigade (United Kingdom)</span> Military unit

98th Brigade was an infantry formation of the British Army created to command 'Kitchener's Army' units during World War I. It served on the Western Front from 1916, seeing action on the Somme, at Arras and Ypres, during the German spring offensive and the final Allied Hundred Days Offensive.

The 173rd Brigade was a formation of the British Army's Territorial Force that was raised in 1915. It was assigned to the 58th Division and served on the Western Front during the First World War. Its number was used for a deception formation during the Second World War.

<span class="mw-page-title-main">Capture of Martinpuich</span>

The Capture of Martinpuich took place on 15 September 1916. Martinpuich is situated 18 mi (29 km) south of Arras, near the junction of the D 929 and D 6 roads, opposite Courcelette, in the Pas-de-Calais, France. The village lies south of Le Sars, west of Flers and north-west of High Wood. In September 1914, during the Race to the Sea, the divisions of the German XIV Corps advanced on the north bank of the Somme westwards towards Albert and Amiens, passing through Martinpuich.

<span class="mw-page-title-main">Capture of Lesbœufs</span> Battle during the First World War

The Capture of Lesbœufs [25 September 1916] was a tactical incident in the Battle of the Somme. Lesbœufs was a village on the D 74 between Gueudecourt and Morval, about 30 miles (48 km) north-east of Amiens; Le Transloy lies to the north-west and Bapaume is to the north. French Territorials fought the II Bavarian Corps on the north bank of the Somme in late September 1914, after which the front line moved west past the village. Little military activity occurred round the village until the beginning of the Battle of the Somme, when German troops passed through the village in the first weeks of the battle. During the Battle of Flers–Courcelette (15–22 September), advances by the right flank corps of the British Fourth Army, brought the front line forward to the Gallwitz Riegel trenches west of Lesbœufs but exhaustion prevented the British from reaching their third objective, a line east of Morval, Lesbœufs and Gueudecourt.

<span class="mw-page-title-main">Capture of Eaucourt l'Abbaye</span>

The Capture of Eaucourt l'Abbaye was a tactical incident during the Battle of the Somme. Eaucourt is about 16 mi (26 km) south of Arras, at the junction of the D 929 and the D 10E roads. Eaucourt l'Abbaye (Eaucourt) is north-west of Martinpuich, south-east of Le Sars, south of the Butte de Warlencourt west of Gueudecourt and north-west of Flers. Eaucourt was a group of farm buildings in an enclosure built on the site of an Augustinian abbey, on a side road from Le Sars off the main Albert–Bapaume highway. Destremont Farm to the south-west of Le Sars and a derelict quarry south of Eaucourt had been fortified by the Germans.

The Staffordshire Brigade was a volunteer infantry brigade formation of the British Army from 1888 to 1936. It saw active service on the Western Front in World War I, including the attacks on the Hohenzollern Redoubt and the Gommecourt Salient, and the assault crossing of the St Quentin Canal, 'a most remarkable feat of arms'.

<span class="mw-page-title-main">First Battle of Morlancourt</span> World War I battle

The First Battle of Morlancourt was fought over the period 28–30 March 1918, on the Western Front during World War I. The battle saw troops from the Australian 3rd Division advance to fill a gap in the Allied line that had formed north of the River Somme during the German spring offensive. This advance towards Morlancourt was checked by German troops short of the Australian's objective of the spur overlooking Morlancourt and the Australians were subsequently counter-attacked by elements of the German 18th Division. These attacks were repulsed with heavy casualties, as Allied forces blunted the German advance towards Amiens, which subsequently stabilised the Allied line north of the Somme. The fighting then largely moved south; however, in the months following, two further actions – albeit minor – were fought around Morlancourt as the Australians sought to consolidate their positions around the village prior to the start of the Allied Hundred Days Offensive.

References

Books

  • Baldwin, Hanson (1962). World War I: An Outline History. London: Hutchinson. OCLC   988365.
  • Bean, C. E. W. (1995) [1941]. The Australian Imperial Force in France During the Main German Offensive, 1918. The Official History of Australia in the War of 1914–1918. Vol. V (8th ed.). Sydney: Angus and Robertson. OCLC   17648469.
  • Coulthard-Clark, Chris (1998). Where Australians Fought: The Encyclopaedia of Australia's Battles (1st ed.). St Leonards, New South Wales: Allen and Unwin. ISBN   1-86448-611-2.
  • Edmonds, J. E.; Davies, C. B.; Maxwell-Hyslop, R. G. B. (1995). Military Operations France and Belgium, 1918: March–April, Continuation of the German Offensives. History of the Great War Based on Official Documents. Vol. II (Imperial War Museum and Battery Press ed.). London: Macmillan. ISBN   0-89839-223-3.
  • Fathi, Romain (2017). "They Attack Villers-Bretonneux and block the road to Amiens'. A French perspective on Second Villers-Bretonneux". In Tristan Moss; Thomas Richardson (eds.). New Directions in War and History. Newport: Big Sky Publishing. pp. 53–71.
  • Foley, J. (1967). A7V Sturmpanzerwagen. Armour in Profile. Leatherhead: Profile Publications. OCLC   30441493.
  • Grey, Jeffrey (2008). A Military History of Australia (3rd ed.). Melbourne, Victoria: Cambridge University Press. ISBN   978-0-521-69791-0.
  • King, Jonathan (2011). Great Battles in Australian History. Crows Nest, New South Wales: Allen & Unwin. ISBN   978-1-74237-457-4.
  • Laffin, John (1992). A Guide to Australian Battlefields of the Western Front 1916–1918. Kenthurst, New South Wales: Kangaroo Press and the Australian War Memorial. ISBN   0-86417-468-3.
  • Messenger, C. R. M. (1988). Hitler's Gladiator: Life of SS-Oberstgruppenfuhrer and General der Waffen-SS Sepp Dietrich. London: Brassey's. ISBN   0-08031-207-1.
  • Stanley, P. (2010). Bad Characters: Sex, Crime, Murder and Mutiny in the Great War. Sydney: Murdoch Books. ISBN   978-1-74266-216-9.
  • Williams-Ellis, A.; Williams-Ellis, C. (1919). The Tank Corps. New York: G. H. Doran. OCLC   317257337 . Retrieved 3 October 2013.

Journals

  • Chatwin, Dale (December 2019). "The Light Blue & White: the 52nd Battalion AIF at Dernancourt and Villers-Bretonneux, April 1918". Sabretache. LX (4). Garran, Australian Capital Territory: Military Historical Society of Australia: 47–54. ISSN   0048-8933.
  • Morgan, Joseph (March 2014). "Voices from Gallipoli and the Western Front: The Forgotten 26th". Sabretache. LV (1). Garran, Australian Capital Territory: Military Historical Society of Australia: 17–27. ISSN   0048-8933.

Theses

Further reading