Battle of Finschhafen

Last updated

Battle of Finschhafen
Part of World War II, Pacific War
Finschhafen area September 1943 (AWM photo 059763).jpg
A view of Finschhafen, October 1943
Date22 September – 24 October 1943
Location 6°36′S147°51′E / 6.600°S 147.850°E / -6.600; 147.850
Result Allied victory
Belligerents
Flag of Australia (converted).svg  Australia
Flag of the United States (23px).png  United States
Merchant flag of Japan (1870).svg  Japan
Commanders and leaders
Flag of Australia (converted).svg George Wootten
Flag of Australia (converted).svg Victor Windeyer
Hatazo Adachi
Eizo Yamada
Shigeru Katagiri
Units involved

Flag of Australia (converted).svg 9th Division

Flag of the United States.svg 532nd Engineer Boat and Shore Regiment

War flag of the Imperial Japanese Army (1868-1945).svg 20th Division

War flag of the Imperial Japanese Army (1868-1945).svg 41st Division

War flag of the Imperial Japanese Army (1868-1945).svg 51st Division

War flag of the Imperial Japanese Army (1868-1945).svg 1st Shipping Group
Strength
~5,300 (first phase) 4,000 – 5,000 (first phase)
~ 12,000 (second phase)
Casualties and losses
73 killed, 285 wounded (first phase)
49 killed, 179 wounded (second phase)
679 killed, 821 wounded (second phase only)

The Battle of Finschhafen was part of the Huon Peninsula campaign in New Guinea during World War II and was fought between Australian and Japanese forces. The fighting took place between 22 September and 24 October 1943 following the landing at Scarlet Beach, which was followed by a two-pronged advance on Finschhafen as the Australian 20th Infantry Brigade advanced on the town from the north, while the 22nd Infantry Battalion drove from the south, having advanced from the landing beaches east of Lae. After the capture of Finschhafen, the Japanese forces in the area withdrew towards Sattelberg where they sought to hold the Australians before launching a counteroffensive, which subsequently threatened the landing beach. This attack was repelled by Australian and American forces, with heavy casualties being inflicted on the Japanese. In the aftermath, the Australians went on the offensive, capturing Sattelberg, and then advancing towards the Wareo plateau.

Contents

Background

Finschhafen had been occupied by the Imperial Japanese Army on 10 March 1942 as part of strategic moves to provide protection to Lae, which they had established as an important air base. [1] Throughout early 1943, the Allies had begun offensive operations in the Salamaua area of New Guinea and following the landing at Nadzab and capture of Lae in early September 1943, the Allies attempted to exploit their success with an advance to Finschhafen to begin the Huon Peninsula campaign. [2]

The operation to capture Finschhafen was important to capture the western cape of the Vitiaz Strait for the construction of airfields and naval facilities for the upcoming New Britain campaign as part of Operation Cartwheel. [3] [4] The responsibility for securing the Huon Peninsula was assigned to Major General George Wootten's Australian 9th Division. On 22 September, the Australian 20th Infantry Brigade, under the command of Brigadier Victor Windeyer, supported by artillery from the 2/12th Field Regiment, as well as a field company of engineers and a field ambulance, [5] had landed at Scarlet Beach  – about 10 kilometres (6.2 mi) north of Finschhafen [4]  – and proceeded to establish a beachhead there. [6] At the same time, the 22nd Infantry Battalion, an Australian Militia unit that had landed east of Lae in early September to relieve the troops holding the beachhead, [7] began pursuing the Japanese that were withdrawing to the east, marching from Hopoi Mission Station towards Finschhafen, with a view to placing pressure on the Japanese southern flank. [8]

The Japanese had expected an Allied assault on the Finschhafen region from around late July 1943, having appreciated its significance in relation to the Vitiaz and Dampier Straits. The Japanese Eighteenth Army commander, Lieutenant General Hatazo Adachi, had begun moving forces into the region. The majority of these were drawn from the 20th Division, which dispatched a force of about 2,800 men from Madang in August. These forces consisted of the 80th Infantry Regiment, one battalion of the 26th Field Artillery Regiment, and the 7th Naval Base Force. In addition, following the fall of Lae, elements of the 41st Division  – primarily the 238th Infantry Regiment  – and the 51st Division's 102nd Infantry Regiment, were also moved to the area, and were placed under the command of Major General Eizo Yamada, commander of the 1st Shipping Group. The total number of Japanese in the area was around 4,000 to 5,000, [9] [10] although Allied intelligence estimated a strength of between 350 and 2,100. [2]

Yamada's forces were spread out in a series of outposts that were orientated around a main defensive position established at Sattelberg, an abandoned Lutheran mission situated atop a 975-metre (3,199 ft) mountain that dominated the terrain about 12 kilometres (7.5 mi) north-west of Finschhafen. The Japanese forces lacked transportation and the road network had not been fully developed. They were low on ammunition for all calibres of weapons, especially artillery, and the majority of stores had to be carried by combat troops, as local carriers had ceased working for the Japanese in response to Allied propaganda. [11] Following the landing at Scarlet Beach, Yamada was ordered to launch an attack on the Australian forces in order to delay them so that further reinforcements could arrive from the 20th Division. [12]

Battle

Australian drive on Finschhafen

Map showing the capture of Finschhafen Capture of Finschhafen map (Miller).jpg
Map showing the capture of Finschhafen

After the landing, the Australians began establishing a beachhead several kilometres deep, during which significant actions were fought around Siki Cove and Katika. [13] [14] Late in the day, a large Japanese air raid struck the Allied fleet off shore, but this was eventually defeated by a strong US fighter umbrella that was forewarned by Allied picket ships. [15] The following day, 23 September, the 20th Brigade's drive on Finschhafen began, [16] with two battalions commencing the advance south – the 2/13th and 2/15th supported by the 2/12th Field Regiment as well as engineers from the 2/3rd Field Company  – while the 2/17th was split up, with two companies advancing as part of the brigade's reserve, while another remained to secure the beachhead from a Japanese attack and push it further to the north, [10] and the fourth pushed towards Sattelberg. [17] The 2/3rd Pioneer Battalion remained in the beachhead, working to improve roads, while the 2/8th Field Ambulance set up a main dressing station, which would receive casualties as they were evacuated rearwards from the advanced dressing station that was following the battalions advancing south. [18]

In addition to having to split their forces, the Australians also suffered from supply difficulties during the advance. The terrain over the southerly approaches was quite difficult being primarily dense jungle with numerous water crossings and rugged features. To traverse the ground, the Australians had only limited vehicles, with each infantry battalion possessing four jeeps with trailers for resupply, while the engineers and artillery had several trucks and tractors. The local population, which might have been employed to carry stores, had abandoned the Japanese due to Allied propaganda and their services were also unavailable to the Allies at the initial stages of the campaign. As a result, a large amount of stores had to be carried by combat soldiers, who were diverted to the task. [19] Nevertheless, the Australian advance succeeded in capturing the Heldsbach plantation and the nearby airfield. It continued until the Australians came up against strong resistance around the Bumi River. There a force of around 300 Japanese sailors and marines from the 85th Naval Garrison, [20] reinforced by elements of the 238th Infantry Regiment, established themselves in a blocking position. Although they were under orders to conform to the overall Japanese plan of delaying the Australians and then withdrawing towards Sattelberg to carry out a containment operation, the commander of the naval troops resolved to hold the position, and they subsequently held up the Australian advance on 26 September, until they were overcome through an attack on their flanks by the 2/15th Infantry Battalion. [21] [22]

In response to concerns about the large number of Japanese forces in the area, which had proven to be in larger numbers than Allied intelligence had estimated, Windeyer requested reinforcements. These were initially refused as US naval commanders baulked at the idea of transporting another brigade to Finschhafen due to the risks involved and potential naval losses that might be incurred. [23] In addition, the Allied higher headquarters under General Douglas MacArthur was operating under the mistaken belief that the Japanese defending the area were only very small in number, [24] when in actuality the two forces were roughly equal in size, with the Allied strength after the landing being around 5,300. [25] After much discussion amongst Australian and US commands on 29/30 September the 2/43rd Infantry Battalion arrived to relieve the 2/17th. [21] The South Australians from the 2/43rd were subsequently tasked with defending the beachhead and the surrounding areas including the Heldsbach area, and were ordered to prepare for further actions around Sisi and Sattelberg. Heavy rain fell around this time, and the Australian brigade commander was compelled to use combat troops to carry stores forward from the landing zone to the forward areas as motor transport was unable to transit the primitive track system. [26] Due to concerns about their western flank, [27] the 2/17th extended the Australian perimeter towards Jivevaneng, establishing a company there, but it subsequently came under attack on the Sattelberg Road and west of Katika on 25 and 26 September from the Japanese 80th Infantry Regiment, which was trying to break through to the Heldsbach Plantation on the coast. [28] [29] Over the course of several days, the company from the 2/17th around Jivevaneng held off six Japanese attacks until relieved by the 2/43rd Infantry Battalion on 30 September. [30]

Meanwhile, concerned about their rear, due to the presence of a large number of Japanese troops around Sattelberg, the Australians pushed cautiously to Kakakog, which saw heavy fighting at the end of the month, resulting in around 100 Japanese casualties as the Australians called in artillery fire and air attacks to soften up the Japanese defences prior to an attack by the 2/13th Infantry Battalion, supported by Vickers machine guns from the 2/15th. [31] [32] From the south, the 22nd Infantry Battalion advanced north against limited opposition. On 1 October, they crossed the Mape River adjacent to Langemak Bay, while the forward troops from the 20th Infantry Brigade, overwhelmed a Japanese force around Kakakog, supported by artillery and air power, killing between 80 and 100 defenders. Following this, the Japanese began withdrawing from Finschhafen and the next day, the 20th Infantry Brigade reached their objective, entering Finschhafen in the afternoon after overcoming limited resistance. [33] [34] The two forces married up the following day as troops from the 2/17th contacted the 22nd. [35]

This ended the first phase of the battle. During operations to capture Finschhafen, the Australians lost 73 killed, 285 wounded. Sickness also resulted in a further 391 evacuations. Japanese casualties were reported as "heavy", but Allied intelligence assessed that a large number of Japanese forces remained at large and had withdrawn west away from the coast in preparation for further fighting. [33] In the same time, US forces from the 532nd Engineer Boat and Shore Regiment lost eight killed and about 42 wounded, mainly during the landing operations around Scarlet Beach. [36]

Japanese counterattack

Following the capture of Finschhafen, the main part of the Australian 20th Infantry Brigade returned to Scarlet Beach, due to intelligence that the Japanese were about to attack. The 2/13th and 22nd Infantry Battalions were left around Finschhafen, while the 2/15th and 2/17th Infantry Battalions were re-orientated to defend the approaches to Scarlet Beach. [26] Around Jivevaneng, 5 kilometres (3.1 mi) east of Sattelberg, the 2/43rd had taken up a blocking position and in the early days of October fought a Japanese attack by a battalion from the 80th Infantry Regiment along the coast road to a halt. [37] In an effort to shore up their western flank, the Australian 2/17th Infantry Battalion pressed towards Kumawa, which was met with a fierce response from the Japanese on 5 October when their line of communication from the west was threatened. [38] The battalion continued to fight around Jivevaneng, and on 10 October they secured a piece of high ground called the "Knoll" by the Australians, who subsequently defeated 12 attacks to take it back. [39]

A machine gun team from the Australian 2/2nd Machine Gun Battalion around Scarlet Beach, October 1943 Australian 2-2nd MG Battalion troops at Scarlet Beach October 1943 (AWM photo 059578).jpg
A machine gun team from the Australian 2/2nd Machine Gun Battalion around Scarlet Beach, October 1943

On 10/11 October, as it became apparent to the Allies that Japanese were preparing for a major assault, Wootten and his headquarters landed at Finschhafen, along with the remainder of Brigadier Bernard Evans' 24th Infantry Brigade. [40] [38] That day, the bulk of the Japanese 20th Division, under Shigeru Katagiri, arrived in the area, as the size of the Japanese force facing the Australians increased to 12,000; [39] nevertheless, Katagiri decided to hold off on launching his counterattack until stores and ammunition could be stockpiled in sufficient quantities. [40] Meanwhile, the Australian 24th Infantry Brigade was subsequently given responsibility for defence-in-depth around the Heldsbach Plantation and Arndt Point, while the 20th Infantry Brigade defended around the Sattelberg Road and the Mape River, with the 22nd Infantry Battalion on their southern flank around Dreger Harbour. As troops from the 20th Infantry Brigade attempted to push towards Sattelberg, the 24th began patrol actions towards Bonga; during one of these patrols, the Allies gained a significant intelligence boon when they discovered a Japanese briefcase containing an operational order detailing plans for a coming counterattack; in addition, the Allies intercepted several Japanese radio transmissions, and deduced their intentions based upon reports of troop and ship movements. [40] This allowed the Australians to switch to a defensive strategy instead of continuing to push on towards Sattelberg. [41]

The main Japanese counterattack began on 16 October, signalled by a large bonfire on Sattelberg. [42] The attack was conceptualised as a three-pronged action, involving a diversionary attack by elements of the 79th Infantry Regiment to the north from Bonga, a company-level attack on Scarlet Beach from the sea by elements of the 79th with the Sugino Craft Raiding Unit, [43] and a drive from Sattelberg by the remainder of the 79th and 80th Infantry Regiments orientated upon two lines of advance: one towards Scarlet Beach, conforming with the Song River, and the other striking towards Heldsbach advancing astride the Sattelberg Road. [42] If successful, it was intended that following a regrouping, the two infantry regiments would then clear Finschhafen and Langemak Bay, but Japanese plans went awry from the beginning. [44]

The northern diversion was easily overcome, and failed to confuse the Australians into committing their reserves, while the central drive was launched too early – in fact the day before the assault was scheduled to begin – consequently undermining Japanese attempts to achieve sufficient weight of forces to overcome the defenders. The seaborne landing also suffered a significant setback when more than half of the seven landing craft were destroyed by PT-128 and PT-194 on the night of 8/9 October while on their way to the landing beach. They subsequently suffered heavy casualties during the assault around the beach, with US and Australian troops there mounting a stubborn defence. [44] [45] The beach was guarded by a Bofors 40 mm gun of the 10th Light Anti-Aircraft Battery, 2-pounder anti-tank guns and machine guns of the 2/28th, and two 37 mm guns and two .50-calibre machine guns manned by the US 532nd Engineer Boat and Shore Regiment. One of the .50 calibre machine guns, manned by Private Nathan van Noy, assisted by Corporal Stephen Popa, engaged a group of Japanese led by a bugler and two men with flame-throwers. A Japanese hand grenade landed in their weapon pit, shattering one of van Noy's legs and wounding Popa, but they continued to fire. Another Japanese grenade silenced them. Van Noy was subsequently awarded the Medal of Honor. [46]

The Australians managed to hold key terrain around Jivevaneng and Katika from where the Allies employed their direct and indirect fire support to inflict heavy casualties. Nevertheless, the Japanese achieved a degree of tactical success, albeit briefly. On 18 October, a party of Japanese broke through to Siki Cove, where Australian anti-aircraft gunners and artillerymen were forced to fire over "open sights" and fight back with small arms, after coming under fire from troops that had gotten under the guns. That night, the Japanese cut the 2/17th Infantry Battalion's supply route, establishing a road block astride the Jivevaneng–Sattelberg road, and cutting off the Australians defending Jivevaneng. [47] The 2/17th and a number of other Australian units, such as most of the 2/3rd Pioneer Battalion, as well as part of the 2/28th, became isolated behind Japanese lines. [48] In order to keep them supplied, emergency air drops of ammunition were flown in by pilots of No. 4 Squadron RAAF. [49] Presented with the ambiguity of the situation, the commander of the 2/3rd Pioneer Battalion withdrew one of his outposts, while Brigadier Bernard Evans, commander of the 24th Infantry Brigade, also contracted his position around the beachhead, and in doing so subsequently granted the Japanese the prime position of Katika. The Australian divisional commander, Wootten, was enraged by the decision and subsequently lambasted his commander via radio. In response, the 2/13th Infantry Battalion detached two companies from rear area security and sent them north, while the 2/28th Infantry Battalion launched a counterattack against the Japanese around Katika, which – supported by artillery – successfully regained the position. [50]

Nevertheless, largely the fighting went in favour of the Allies, and finally the Japanese assault ground to a halt. Despite forcing a contraction of the Australian forces defending the beachhead, on 21 October the Japanese withdrew from Siki Cove, although the fighting around Katika continued for four more days as the Japanese attempted to retake it. [51] Fierce resistance from the 2/28th halted them and eventually the attack was called off on 24 October, with the Japanese having suffered heavily due to tactical deficiencies, poor co-ordination and operational security, and a lack of artillery. [52] Meanwhile, the Allied response was hampered by poor working relationships at some of the highest levels between Australian and US commanders – particularly between I Corps commander Lieutenant General Edmund Herring and the VII Amphibious Force commander Rear Admiral Daniel E. Barbey  – the lack of a unified command structure, over cautiousness amongst naval staff, and a poor appreciation of overall Japanese strength and intentions by the highest level of the Allied command who failed to send reinforcements until it was almost too late. [50] Casualties during the attack amounted to at least 679 Japanese killed with another 821 estimated as wounded, while the Australians lost 49 killed and 179 wounded. [53]

Aftermath

Wrecked Japanese barges at Scarlet Beach following a failed Japanese attack, 17 October 1943 Wrecked Japanese barges at Scarlet Beach 1.jpg
Wrecked Japanese barges at Scarlet Beach following a failed Japanese attack, 17 October 1943

Following the conclusion of the fighting around Finschhafen and the defeat of the Japanese counterattack, the Allies began preparing for a concerted assault on the Japanese main defensive position around Sattelberg. In the wake of the Japanese counterattack, the members of the Australian and American staff began working more closely together and reinforcements were quickly approved in the form of the 26th Infantry Brigade, under the command of Brigadier David Whitehead, as well as a squadron of Matilda tanks from the 1st Tank Battalion  – whose presence the Australians sought to keep secret for as long as possible [54]  – which were landed at Langemak Bay. [55] [56] Supplies were landed by US troops from the 532nd Engineer Boat and Shore Regiment, and then brought up and cached around Jivevaneng and Kumawa, [57] but heavy rain hampered the Australian efforts until mid-November. [58]

The Australians subsequently were able to reduce and then secure the Japanese strong hold around Sattelberg against determined resistance following a hard slog through dense jungle, working in concert with the Matilda tanks. Elsewhere, further actions were planned, with the 7th Division preparing to advance through the Markham and Ramu Valleys as part of the inland advance towards Shaggy Ridge and then the north coast, in order to cut off the Japanese withdrawal route from the Huon Peninsula. This drive would ultimately be unsuccessful in preventing the bulk of the Japanese forces on the Huon Peninsula from escaping. At the same time, once Sattelberg was secured, a simultaneous drive was undertaken to clear the Wareo plateau, which provided good observation towards Scarlet Beach as well as serving as a junction for Japanese lines of communication south. [41] Once Wareo was secure, the Allies advanced along the coast towards Sio, while US forces landed at Saidor to follow up the withdrawing Japanese. Nevertheless, the US and Australian forces would come up against the same forces throughout the remainder of the war around Madang and Aitape–Wewak. [59]

Finschhafen was subsequently developed into "one of the largest bases in the Southwest Pacific area" according to Garth Pratten. [60] Throughout 1944, the base saw considerable development with the establishment of a staging camp that had a divisional capacity, a wharf, ramps for tank landing ships LSTs ramps and piers. In addition, several airfields were established capable of hosting both fighter and bomber aircraft, as well as several fuel dumps. From Finschhafen, the Allies were able to project air power towards the main Japanese base at Rabaul, and seal off the Vitiaz and Dampier Straits. In addition, the base became an important logistics hub, playing an important role in supplying the American war machine as it advanced through the Philippines in 1944–1945. [60]

In 1961, the battle honour "Finschhafen" was awarded to the Australian Army units that had been involved in the capture of Finschhafen. Covering the period 22 September to 8 December 1943, it includes the capture of Scarlet Beach, the Defence of Scarlet Beach, and the fighting for Sattelberg, although separate battle honours were also awarded for these actions. [61] [62] [63]

Related Research Articles

<span class="mw-page-title-main">9th Division (Australia)</span> WW2 Australian Army formation

The 9th Division was a division of the Australian Army that served during World War II. It was the fourth division raised for the Second Australian Imperial Force. The distinctions of the division include it being:

<span class="mw-page-title-main">Battle of Balikpapan (1945)</span> 1945 battle of World War II

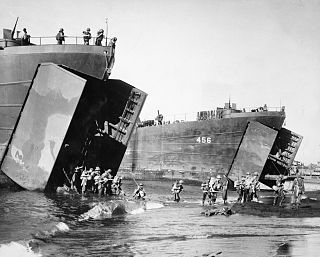
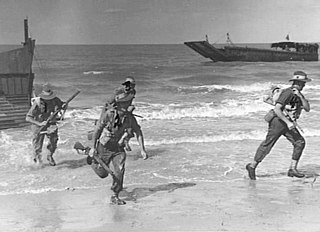
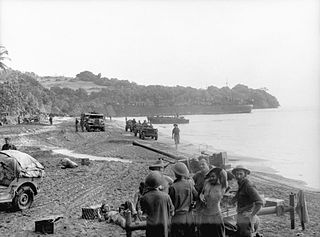
The Battle of Balikpapan was the concluding stage of Operation Oboe, the campaign to liberate Japanese-held British and Dutch Borneo. The landings took place on 1 July 1945. The Australian 7th Division, composed of the 18th, 21st and 25th Infantry Brigades, with a small number of Netherlands East Indies KNIL troops, made an amphibious landing, codenamed Operation Oboe Two, a few miles north of Balikpapan. The Allied invasion fleet consisted of around 100 ships. The landing had been preceded by heavy bombing and shelling by Australian and US air and naval forces. The Allied force totalled 33,000 personnel and was commanded by Major General Edward Milford, while the Japanese force, commanded by Rear Admiral Michiaki Kamada, numbered between 8,400 and 10,000, of which between 3,100 and 3,900 were combatants. After the initial landing, the Allies secured the town and its port, and then advanced along the coast and into the hinterland, capturing the two Japanese airfields. Major combat operations concluded around 21 July, but were followed by mopping-up operations, which lasted until the end of the war in mid-August. Australian troops remained in the area until early 1946.

<span class="mw-page-title-main">Battle of North Borneo</span> 1945 battle of World War II

The Battle of North Borneo took place during the Second World War between Allied and Japanese forces. Part of the wider Borneo campaign of the Pacific War, it was fought between 10 June and 15 August 1945 in North Borneo. The battle involved a series of amphibious landings by Australian forces on various points on the mainland around Brunei Bay and upon islands situated around the bay. Japanese opposition to the landings was sporadic initially, although as the campaign progressed a number of considerable clashes occurred and both sides suffered significant casualties, although major combat was largely restricted to Labuan and around Beaufort. On the mainland, while Allied conventional operations focused largely on the coastal areas around Brunei Bay, guerrilla forces consisting of Dayak tribesmen and small numbers of Allied personnel from the Services Reconnaissance Department fought an unconventional campaign in the interior. The Allies were successful in seizing control of the region. Nevertheless, many of the strategic gains that possession of North Borneo provided were ultimately negated by the sudden conclusion of the war in August 1945.

<span class="mw-page-title-main">Battle of Cape Gloucester</span> WWII battle in the Pacific Theater

The Battle of Cape Gloucester was fought in the Pacific theater of World War II between Japanese and Allied forces on the island of New Britain, Territory of New Guinea, between 26 December 1943 and 16 January 1944. Codenamed Operation Backhander, the US landing formed part of the wider Operation Cartwheel, the main Allied strategy in the South West Pacific Area and Pacific Ocean Areas during 1943–1944. It was the second landing the US 1st Marine Division had conducted during the war thus far, after Guadalcanal. The objective of the operation was to capture the two Japanese airfields near Cape Gloucester that were defended by elements of the Japanese 17th Division.

<span class="mw-page-title-main">Huon Peninsula campaign</span> Part of the New Guinea Campaign of the Pacific Theater (World War II)

The Huon Peninsula campaign was a series of battles fought in north-eastern Papua New Guinea in 1943–1944 during the Second World War. The campaign formed the initial part of an offensive that the Allies launched in the Pacific in late 1943 and resulted in the Japanese being pushed north from Lae to Sio on the northern coast of New Guinea over the course of a four-month period. For the Australians, a significant advantage was gained through the technological edge that Allied industry had achieved over the Japanese by this phase of the war, while the Japanese were hampered by a lack of supplies and reinforcements due to Allied interdiction efforts at sea and in the air.

<span class="mw-page-title-main">Salamaua–Lae campaign</span> Part of the New Guinea campaign of World War II

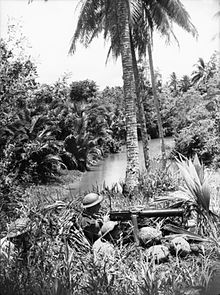
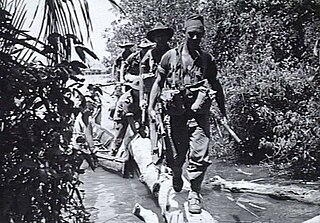
The Salamaua–Lae campaign was a series of actions in the New Guinea campaign of World War II. Australian and United States forces sought to capture two major Japanese bases, one in the town of Lae, and another one at Salamaua. The campaign to take the Salamaua and Lae area began after the successful defence of Wau in late January, which was followed up by an Australian advance towards Mubo as the Japanese troops that had attacked Wau withdrew to positions around Mubo. A series of actions followed over the course of several months as the Australian 3rd Division advanced north-east towards Salamaua. After an amphibious landing at Nassau Bay, the Australians were reinforced by a US regimental combat team, which subsequently advanced north up the coast.

<span class="mw-page-title-main">Battle of Sio</span> 1943–44 New Guinea campaign phase in WWII

The Battle of Sio, fought between December 1943 and March 1944, was the break-out and pursuit phase of General Douglas MacArthur's Huon Peninsula campaign, part of the New Guinea campaign of World War II.

<span class="mw-page-title-main">Landing at Lae</span> Amphibious landing of World War II

The Landing at Lae was an amphibious landing to the east of Lae and then the subsequent advance on the town during the Salamaua–Lae campaign of World War II. Part of Operation Postern, which was undertaken to capture the Japanese base at Lae, the landing was undertaken between 4 and 6 September 1943 by Australian troops from the 9th Division, supported by US naval forces from the VII Amphibious Force. The first major amphibious operation undertaken by the Australian Army since the failed Gallipoli Campaign, the Australians invested a significant amount of effort into planning the operation.

<span class="mw-page-title-main">2/48th Battalion (Australia)</span> Infantry battalion of the Australian Army

The 2/48th Battalion was an infantry battalion of the Australian Army which served during the Second World War. Raised in Adelaide in South Australia in August 1940, the battalion formed part of the 26th Brigade and was initially assigned to the 7th Division, although it was later transferred to the 9th Division in 1941 when it was deployed to the Middle East. While there, it saw action during the siege of Tobruk and the First and Second Battles of El Alamein before being returned to Australia to take part in the fighting in New Guinea following Japan's entry into the war.

<span class="mw-page-title-main">24th Brigade (Australia)</span> Infantry brigade of the Australian Army during World War II

The 24th Brigade was a brigade-sized infantry unit of the Australian Army. Formed on 1 July 1940 as part of the Second Australian Imperial Force, the unit was raised for service during World War II. Originally formed as part of the 8th Australian Division the brigade was subsequently transferred to the newly created 9th Australian Division in December. The brigade served during the Western Desert Campaign, forming part of the Allied garrison during the Siege of Tobruk. Later, the brigade was withdrawn to Syria for occupation duties, but then later took part in the First and Second Battles of El Alamein. In early 1943, the brigade was returned to Australia to fight against the Japanese in the Pacific. In 1943–1944, the brigade fought in New Guinea, taking part in the landing at Lae and the Huon Peninsula campaign. Its final campaign came late in the war, when it took part in the Labuan landings and the Battle of North Borneo in mid-1945. After the war, the brigade was disbanded in early 1946.

<span class="mw-page-title-main">20th Brigade (Australia)</span> Infantry brigade of the Australian Army during World War II

The 20th Brigade was a brigade-sized infantry unit of the Australian Army. First raised in 1912 as a Militia formation to provide training under the compulsory training scheme, the brigade was later re-raised on 7 May 1940 as part of the all volunteer Second Australian Imperial Force for service during the World War II. The brigade was initially assigned to the 7th Division, but was later transferred to the 9th Division in early 1941. They subsequently took part in the Siege of Tobruk that year, and then the First and Second Battles of El Alamein in 1942. In early 1943, the brigade was returned to Australia to join the fighting against the Japanese in the Pacific. In late 1943, the brigade took part in the capture of Lae and then the Huon Peninsula campaign. Withdrawn to Australia in early 1944, its final campaign came during the Battle of North Borneo in the final months of the war. It was disbanded in February 1946.

<span class="mw-page-title-main">Battle of Sattelberg</span> Part of the Pacific theatre of the Second World War

The Battle of Sattelberg took place between 17 and 25 November 1943, during the Huon Peninsula campaign of the Second World War. Involving forces from Australia, the United States and Japan, the fighting centred on the Sattelberg mission station which was situated atop a hill about 900 metres (3,000 ft) above sea level, approximately 8 kilometres (5.0 mi) inland from Finschhafen, New Guinea. Following the Australian landing at Scarlet Beach a large force of Japanese had retreated inland towards Sattelberg. The Japanese, holding the high ground, subsequently threatened the Australian lines of communication as they advanced south towards Finschhafen. The Australian 26th Brigade was tasked with capturing the mission to neutralise this threat. Over the course of 10 days they advanced west from Jivevaneng up the southern approaches to the mission, reducing the Japanese position with armour, artillery, and air support. The Japanese finally abandoned Sattelberg and withdrew north to Wareo, having suffered heavy casualties and running low on supplies.

<span class="mw-page-title-main">Landing at Scarlet Beach</span> 1943 landing in New Guinea

The Landing at Scarlet Beach took place in New Guinea during the Huon Peninsula campaign of the Second World War, involving forces from Australia, the United States and Japan. Allied forces landed at Scarlet Beach, north of Siki Cove and south of the Song River, to the east of Katika and about 10 kilometres (6.2 mi) north of Finschhafen. The capture of Finschhafen allowed the construction of air base and naval facilities to assist Allied air and naval forces to conduct operations against Japanese bases in New Guinea and New Britain.

<span class="mw-page-title-main">2/43rd Battalion (Australia)</span> Military unit

The 2/43rd Battalion was an infantry battalion of the Australian Army. Raised in July 1940 in South Australia as part of the 24th Brigade, the battalion was initially part of the 8th Division, until the 24th Brigade was re-allocated to the 9th Division in late 1940. It was with this formation that the 2/43rd saw service in the Middle East in 1941–1942, taking part in the fighting at Tobruk and in the First and Second Battles of El Alamein. It also undertook garrison duties in Syria, before returning to Australia early in 1943 to fight against the Japanese in the Pacific.

The 2/3rd Pioneer Battalion was a pioneer battalion of the Australian Army, which served during World War II. Formed in 1940, the battalion served in the Middle East where it fought in Syria and Palestine before taking part in the fighting around El Alamein. In 1943, the battalion returned to Australia and subsequently took part in the fighting against the Japanese in New Guinea in 1943–1944. Their final campaign came in mid-1945, when they took part in the Battle of Tarakan during the Borneo campaign. The battalion was disbanded in early 1946.

<span class="mw-page-title-main">2/2nd Machine Gun Battalion (Australia)</span> Former battalion of the Australian Army

The 2/2nd Machine Gun Battalion was an infantry support unit of the all-volunteer Second Australian Imperial Force that was raised for service overseas during the Second World War. Formed in mid-1940 in Sydney, from personnel drawn from the states of Queensland and New South Wales, the battalion was allocated to the Australian 9th Division. After completing training in Australia, the battalion operated in the Middle East between early 1941 and early 1943, seeing action against German and Italian forces at the First and Second Battles of El Alamein, and undertaking garrison duties in Syria as part of the Allied garrison that was established there after the Syria–Lebanon campaign.

<span class="mw-page-title-main">Battle of Wareo</span> Part of the Huon Peninsula campaign of World War II

The Battle of Wareo was fought by Australian and Japanese forces in New Guinea during the Huon Peninsula campaign of World War II in the later part of 1943. Coming after the capture of Sattelberg by the Allies, the battle took place amidst the Australian advance north towards Sio. The Australians committed elements from four infantry brigades from the Australian 9th Division with supporting elements including artillery, engineers and tank support, while the Japanese force consisted primarily of two depleted infantry regiments from the 20th Division, with limited artillery support.

<span class="mw-page-title-main">22nd Battalion (Australia)</span> Military unit

The 22nd Battalion was an infantry battalion of the Australian Army. It was raised in 1915 as part of the Australian Imperial Force for service during World War I and formed part of the 6th Brigade, attached to the 2nd Division. It fought during the Gallipoli campaign and on the Western Front before being disbanded in 1919. In 1921, it was re-raised as a part-time unit and was merged with the 29th Battalion in 1930 to form the "29th/22nd Infantry Battalion". Split in August 1939 and known as the "22nd Battalion ", the battalion saw action against the Japanese during World War II in the Huon Peninsula and New Britain campaigns. The battalion was disbanded in June 1946. It was re-established as part of the Royal Victoria Regiment in the mid-1960s as a remote area battalion within the Citizens Military Force, and later became a part of the 8th/7th Battalion, Royal Victoria Regiment.

<span class="mw-page-title-main">2/24th Battalion (Australia)</span> Infantry battalion of the Australian Army

The 2/24th Battalion was an infantry battalion of the Australian Army, which served during World War II. A unit of the all-volunteer Second Australian Imperial Force, it was formed in July 1940 from primarily Victorian volunteers and was known as "Wangaratta's Own" because of the time the battalion spent in the town during its formative period prior to deployment overseas. It served in North Africa in 1941–1942 as part of the 26th Brigade, which was assigned to the 7th Division, before being reassigned to the 9th Division. In early 1943, the battalion returned to Australia and later took part in campaigns against the Japanese in New Guinea in 1943–1944 and Borneo in 1945, before being disbanded in 1946. The 2/24th suffered the highest number of battle casualties of any 2nd AIF infantry battalion.

<span class="mw-page-title-main">Battle of Madang</span> Part of New Guinea campaign of World War II

The Battle of Madang, fought between early February and late April 1944, was the break-out and pursuit phase of the Markham and Ramu Valley – Finisterre Range and Huon Peninsula campaigns, which were part of the wider New Guinea campaign of World War II. After overcoming the Japanese defences around Shaggy Ridge, the Australian forces descended the steep slopes of the Finisterre Range and pursued the withdrawing Japanese towards Bogadjim and then Madang on the north coast of New Guinea. There they linked up with US and Australian forces that had advanced along the coast from the Huon Peninsula, while the remnants of three Japanese divisions withdrew towards Wewak, where further fighting would take place throughout late 1944 and into 1945.

References

  1. "March". This Month in Australian Military History. Australian War Memorial. Retrieved 14 February 2016.
  2. 1 2 Keogh 1965, p. 315.
  3. Miller 1959, p. 214.
  4. 1 2 Coulthard-Clark 1998, p. 242.
  5. Keogh 1965, p. 317.
  6. Keogh 1965, pp. 315–316.
  7. Australian Military Forces 1944, p. 46.
  8. Keogh 1965, p. 316.
  9. Pratten 2014, pp. 260–261.
  10. 1 2 Keogh 1965, p. 322.
  11. Pratten 2014, pp. 261–262.
  12. Miller 1959, pp. 218–219.
  13. Maitland 1999, p. 80.
  14. Johnston 2005, pp. 4–5.
  15. Dexter 1961, p. 466.
  16. Coates 1999, p. 98.
  17. Coates 1999, p. 96.
  18. Coates 1999, p. 97.
  19. Coates 1999, p. 99.
  20. Tanaka 1980, p. 179.
  21. 1 2 Miller 1959, p. 218.
  22. Coates 1999, pp. 99–100.
  23. Pratten 2014, p. 266.
  24. Keogh 1965, p. 323.
  25. Casey 1959, p. 125.
  26. 1 2 Keogh 1965, p. 324.
  27. Johnston 2005, p. 5.
  28. Pratten 2014, pp. 265–266.
  29. Tanaka 1980, p. 180.
  30. Coates 1999, p. 182.
  31. Coates 1999, pp. 117–119.
  32. Coulthard-Clark 1998, pp. 242–243.
  33. 1 2 Coulthard-Clark 1998, p. 243.
  34. Grant 1992, p. 124.
  35. Pratten 2014, p. 265.
  36. Dexter 1961, p. 500.
  37. Tanaka 1980, p. 190.
  38. 1 2 Coulthard-Clark 1998, p. 244.
  39. 1 2 Johnston 2005, p. 6.
  40. 1 2 3 Pratten 2014, p. 267.
  41. 1 2 Keogh 1965, p. 325.
  42. 1 2 Pratten 2014, pp. 267–268.
  43. Tanaka 1980, p. 184.
  44. 1 2 Pratten 2014, p. 268.
  45. Morison 1950, p. 273.
  46. Dexter 1961, pp. 530–531.
  47. Johnston 2005, p. 7.
  48. Maitland 1999, p. 81.
  49. Johnston 2005, pp. 7 & 36.
  50. 1 2 Pratten 2014, p. 269.
  51. Johnston 2005, pp. 7–8.
  52. Pratten 2014, pp. 267–269.
  53. Coulthard-Clark 1998, p. 245.
  54. Keogh 1965, pp. 328–329.
  55. Maitland 1999, p. 181.
  56. Pratten 2014, p. 271.
  57. Coates 1999, p. 211.
  58. Keogh 1965, p. 329.
  59. Keogh 1965, pp. 345–428.
  60. 1 2 Pratten 2014, p. 280.
  61. "Finschhafen". Battle Honours. Australian War Memorial. Archived from the original on 29 May 2016. Retrieved 18 February 2016.
  62. Maitland 1999, p. 77.
  63. Rodger 2003, p. 361.

Bibliography